In this blog post, we will explore a practical project—a password generator built using Vite, React, and Tailwind CSS. This project allows you to customize and generate passwords with different lengths and characteristics, such as including numbers or special characters. You can also copy the generated password to your clipboard with a single click. Let’s dive into the code and understand how it works.
Project Setup
Before we delve into the code, let’s get acquainted with the project structure:
README.mdnode_modulespackage.jsonpublictailwind.config.jsindex.htmlpackage-lock.jsonpostcss.config.jssrcvite.config.js
The core of the project resides in the src directory, which contains the App.jsx file, where the password generation and UI are defined.
App.jsx: Building the Password Generator
Our App.jsx file defines the main component, App, which manages the password generation and provides a user interface for customizing the passwords.
import { useState, useCallback, useEffect } from 'react'

function App() {
  // State variables to manage password properties
  let [length, setLength] = useState(8)
  let [numberAllowed, setNumberAllowed] = useState(false)
  let [charAllowed, setCharAllowed] = useState(false)
  let [password, setPassword] = useState()

  // Password generation logic
  let passwordGenerator = useCallback(() => {
    let pass = ""
    let str = "ABCDEFGHIJKLMNOPQRSTUVWXYZabcdefghijklmnopqrstuvwxyz"

    if (numberAllowed) {
      str += "0123456789"
    }

    if (charAllowed) {
      str += "!@#$%^&*_-+=<>?/|()[]{}:;,'`~"
    }

    for (let i = 0; i < length; i++) {
      let char = Math.floor(Math.random() * str.length)
      pass += str.charAt(char)
    }

    setPassword(pass)
  }, [length, numberAllowed, charAllowed, setPassword])

  // Function to copy the generated password to the clipboard
  let copyPasswordToClipboard = useCallback(() => {
    window.navigator.clipboard.writeText(password)
  }, [password])

  // Update password whenever settings change
  useEffect(() => {
    passwordGenerator()
  }, [length, numberAllowed, charAllowed, passwordGenerator])

  return (
    <>
      <div className='w-full max-w-md mx-auto shadow-md rounded-lg px-4 py-8 my-8 text-black-800 bg-blue-300'>
        <h1 className='text-black text-center font-bold my-3'>Password Generator</h1>
        <div className='flex shadow rounded-lg overflow-hidden mb-4'>
          <input
            type="text"
            value={password}
            readOnly
            className='outline-none w-full py-1 px-3'
            placeholder='Password'
          />

          <button className='outline-none bg-blue-500 text-white px-3 py-0.5 shrink-0' onClick={copyPasswordToClipboard}>
            COPY
          </button>
        </div>

        <div className='flex text-sm gap-x-2'>
          <div className='flex items-center gap-x-1'>
            <input
              type="range"
              value={length}
              min={8}
              max={24}
              className='cursor-pointer'
              onChange={(event) => {
                setLength(event.target.value)
              }}
            />

            <label className='font-semibold text-black'>
              Length: {length}
            </label>
          </div>

          <div className='flex items-center gap-x-1'>
            <input
              type="checkbox"
              defaultChecked={numberAllowed}
              onChange={() => {
                setNumberAllowed((prev) => !prev)
              }}
            />

            <label className='font-semibold text-black'>
              Numbers
            </label>
          </div>

          <div className='flex items-center gap-x-1'>
            <input
              type="checkbox"
              defaultChecked={charAllowed}
              onChange={() => {
                setCharAllowed((prev) => !prev)
              }}
            />

            <label className='font-semibold text-black'>
              Characters
            </label>
          </div>
        </div>
      </div>
    </>
  )
}

export default App
Code Explanation
- We start by importing necessary hooks and components from React to build our application.
- We define several state variables to manage the password properties, including
length(password length),numberAllowed(whether to include numbers),charAllowed(whether to include special characters), andpassword(the generated password).
- The
passwordGeneratorfunction is defined using theuseCallbackhook. It generates passwords based on the selected properties and updates thepasswordstate variable.
- We provide a
copyPasswordToClipboardfunction, also using theuseCallbackhook, to copy the generated password to the clipboard.
- We use the
useEffecthook to update the password whenever the password settings change, ensuring that the password is generated with the latest configuration.
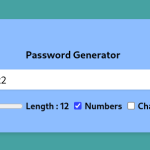
- In the JSX portion, we create a user interface to customize and display the generated password. Users can adjust the password length using a range input, select whether to include numbers or special characters using checkboxes, and view the generated password. A “COPY” button allows users to copy the password to their clipboard.
main.jsx: Entry Point
The main.jsx file serves as the entry point for our application, where we render the App component.
import React from 'react'
import ReactDOM from 'react-dom/client'
import App from './App.jsx'
import './index.css'

ReactDOM.createRoot(document.getElementById('root')).render(
  <React.StrictMode>
    <App />
  </React.StrictMode>,
)
Code Explanation
- We import React and ReactDOM to render our
Appcomponent into the HTML document.
- The
Appcomponent is imported from theApp.jsxfile.
- We create a React root using
ReactDOM.createRootand attach it to therootelement in our HTML file. This is where our React app will be rendered.
- To ensure a safer development experience, we wrap the
Appcomponent in a<React.StrictMode>component. This enables various development features and checks in React to help catch potential issues early.
Conclusion
You’ve successfully built a password generator application using Vite, React, and Tailwind CSS. This project allows users to customize and generate passwords according to their preferences, making it a useful tool for enhancing security and privacy.
Building projects like this is a fantastic way to solidify your understanding of React and explore its ecosystem of libraries and tools. You can further enhance this project by adding features like password strength indicators, saving generated passwords, or improving the user interface. The possibilities are endless, and this project is a stepping stone for your journey as a web developer.
Have fun experimenting with your new password generator, and enjoy coding!
Thanks for reading, and see you in the next post with more projects revolving around web development.
If you’re as passionate about Cyber-Security as I am, feel free to follow me on Twitter – @ANShrivastava03 for the latest updates and connect with me on LinkedIn – Aditya Narayan to stay in the loop with my posts and insights in the world of digital forensics. Let’s continue this fascinating journey together!