
Hey folks, we’re back with the next chapter of our APT investigation journey. If you’ve been following along, you know we’ve been knee-deep in this cyber-security challenge. In Part-1, we scratched the surface and uncovered some interesting details about an APT incident at Wayne Enterprises, using Splunk to guide us.
If you haven’t already then you can read Part-1 here.
Now, let’s get into the nitty-gritty in Part Two. We’ll spill the beans on what we found and try to answer all the questions.
Identifying the Executable Uploaded
As the name of the title suggests, we need to now look for the executable file which was uploaded and eventually compromised the web application.
The easiest way to find the file with .exe extension would be to search in results from Suricata, as it will have all the relevant logs associated with that file.
To build our search query, the approach should be :
- Load the dataset (botsv1)
- Select sourcetype as Suricata because we want to see its logs
- Next assign the web server’s IP as destination IP because we want to see logs that were received on our web server
- Finally we want to specify the file that we want to find.
Our search query will be : index=”botsv1″ imreallynotbatman.com sourcetype=suricata dest_ip=”192.168.250.70″ “fileinfo.filename”=”*.exe” | table fileinfo.filename | stats count by fileinfo.filename | fields count, fileinfo.filename
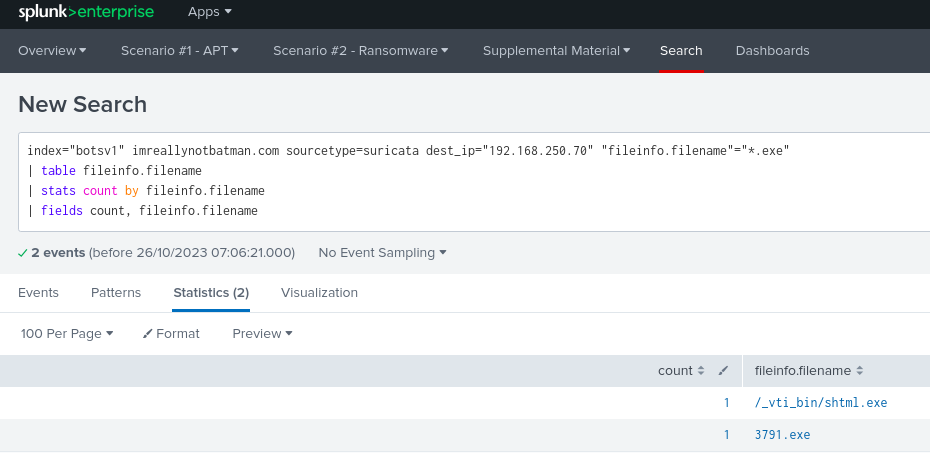
Here we see 2 exe files, named : /_vti_bin/shtml.exe and 3791.exe
Now we know that we have two executable files that were sent to our web server, but how are we going to figure out which one is malicious.
For that we need to find the source of these requests, because if the source is the same as that of APTs then we surely know which is the malicious file among them.
Now to think logically, if these files were sent to the web server then the method that they had to use were POST, so we can go ahead and filter all the results for HTTP POST method and then further narrow down our results to validate our findings.
Our search query will be : index=”botsv1″ imreallynotbatman.com sourcetype=suricata dest_ip=”192.168.250.70″ “http.http_method”=POST “fileinfo.filename”=”*.exe” | table src, fileinfo.filename

Well that didn’t go as planned, I thought with this logic we’ll finally be able to come to a conclusion but it seems that we need a little more digging into it.
I had to take a bit of help from ChatGPT where I tried to search the names of these files thinking that not both of them can be malicious and one of them has to be an ordinary file needed for whatever purpose.
And guess what, I was right!!!
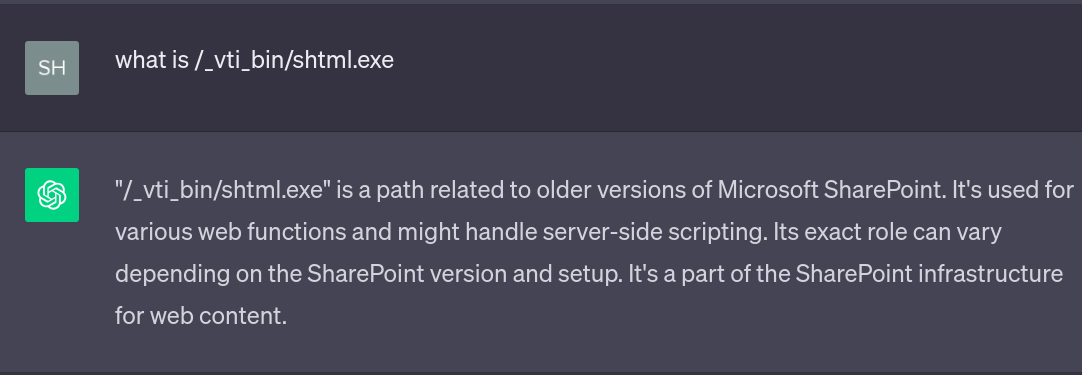
That makes the 3791.exe to be malicious. Well great then, we were able to find the executable file that was uploaded on our web server.
Onto the next section….
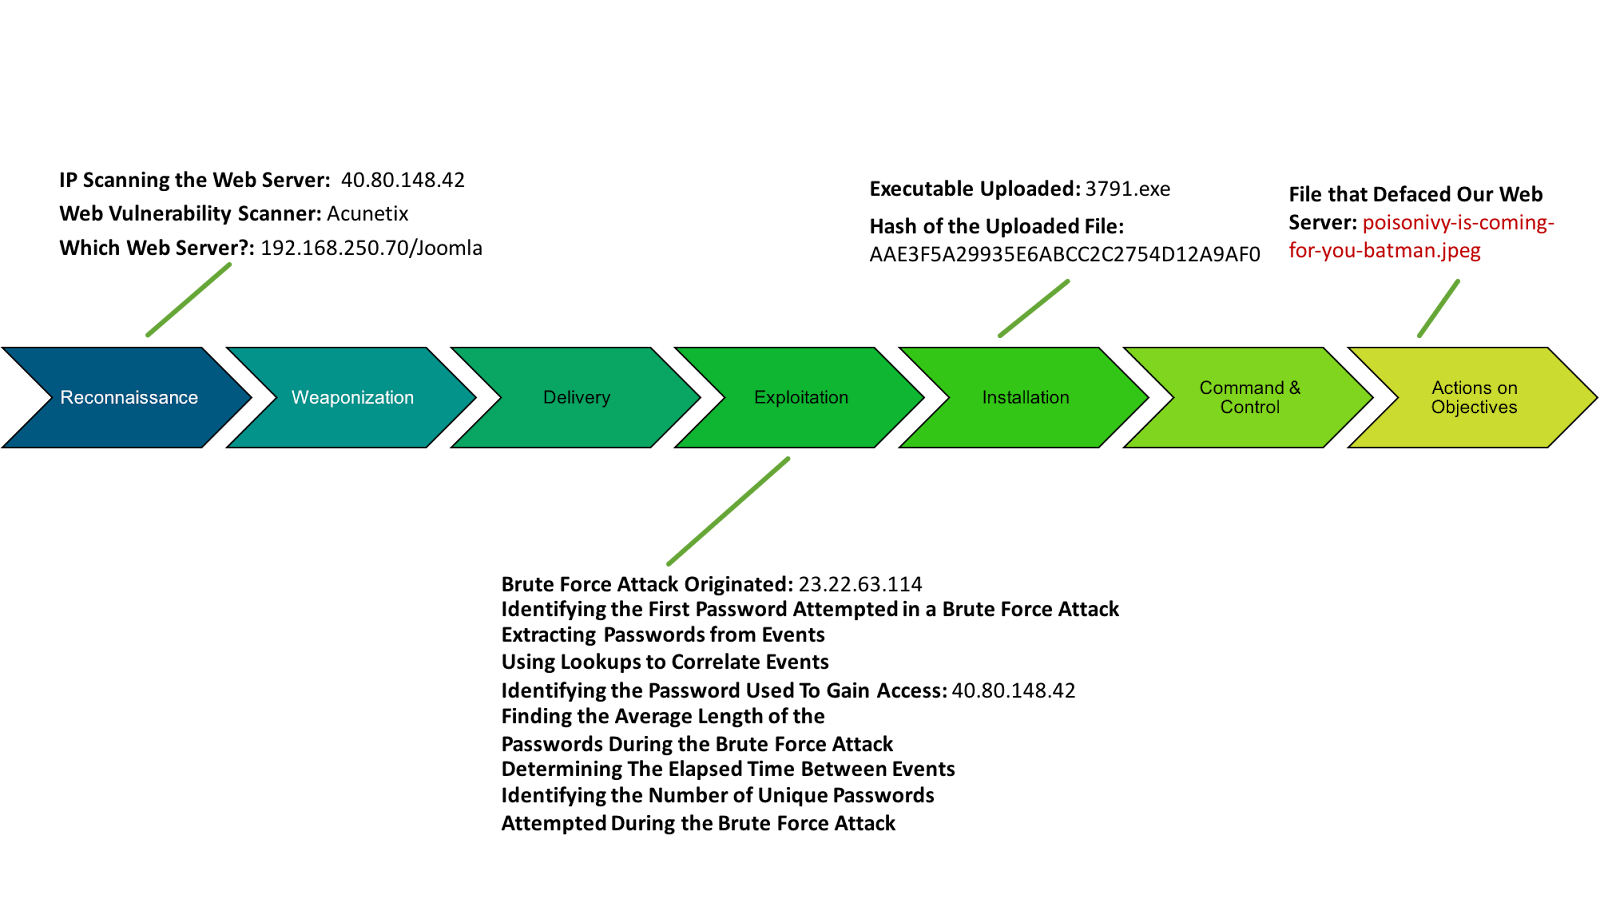
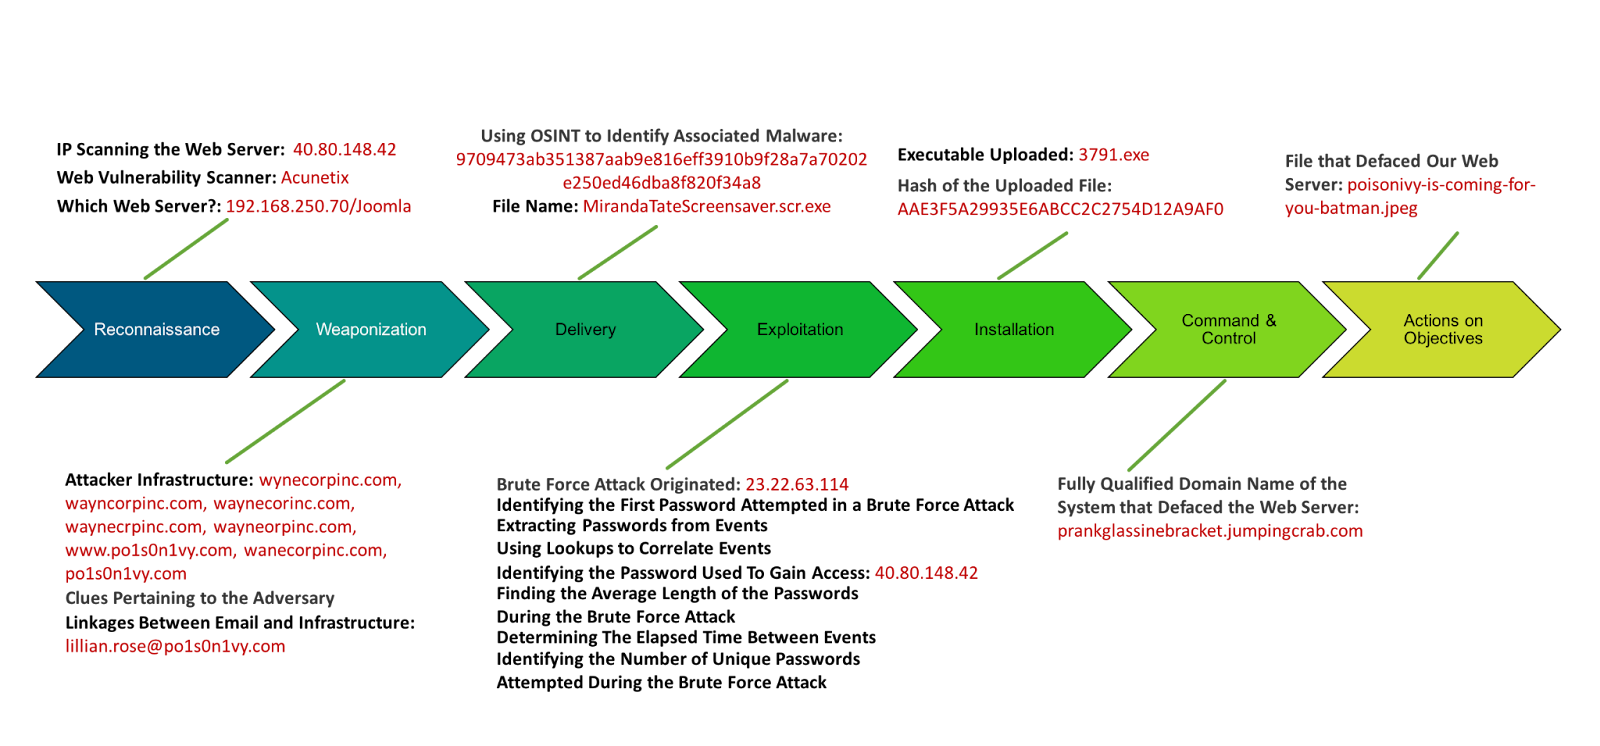
Lockheed Martin Kill Chain –

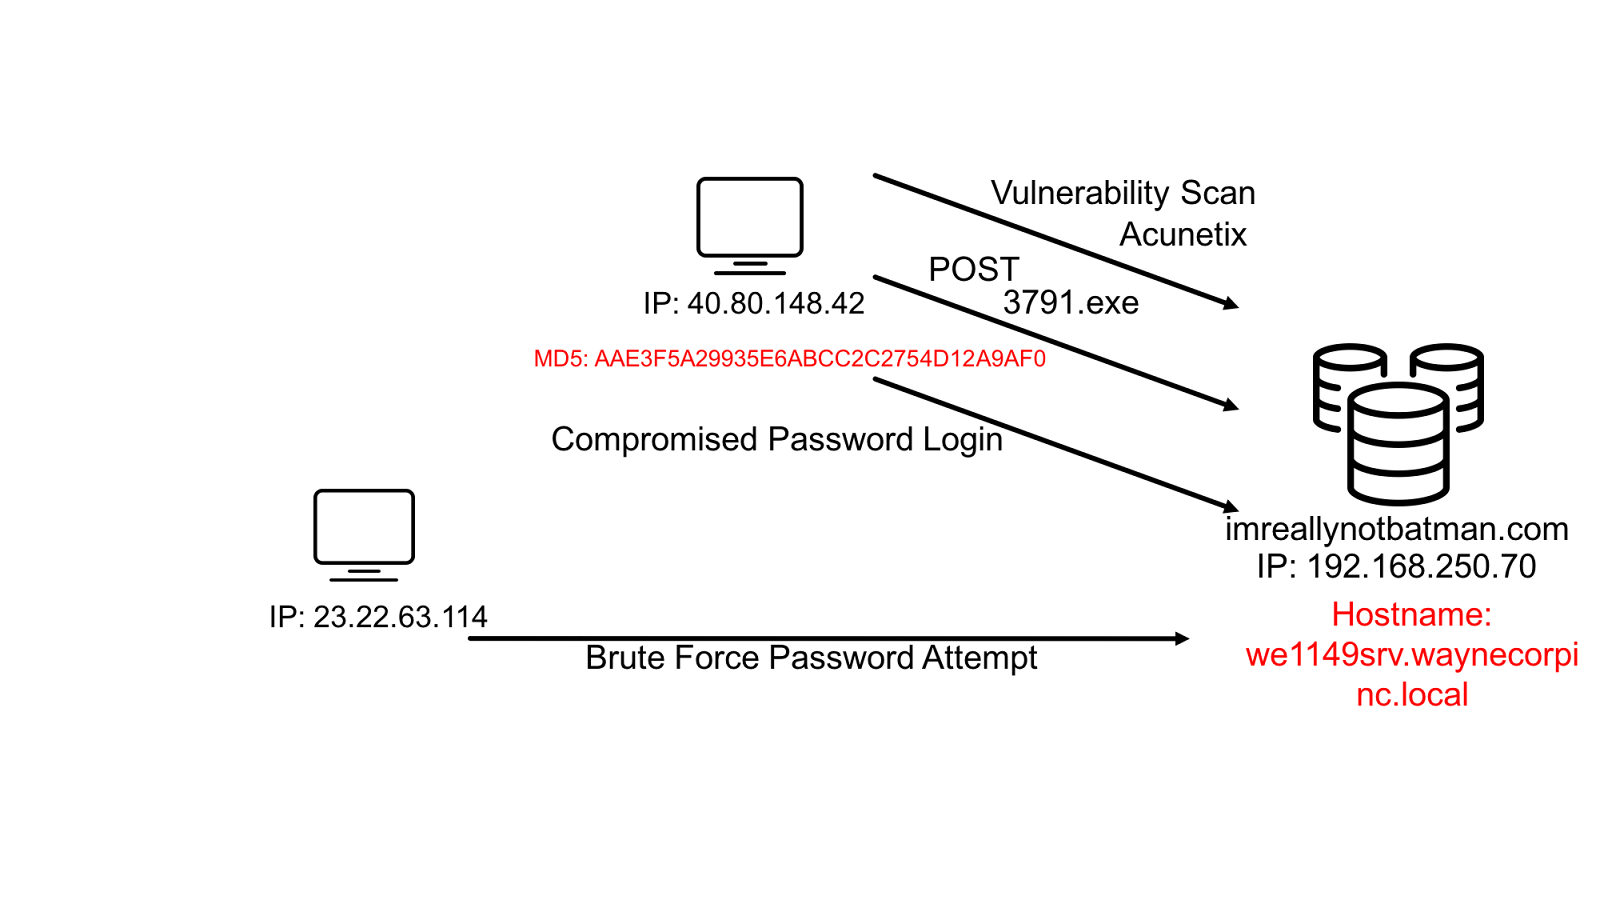
Threat Picture –

Determining the Hash of the Uploaded File
Now during any investigation, when dealing with malicious files uploaded to web servers, it’s important to find the file’s hash, which is like a unique digital signature for that file.
This hash helps in several ways:
- It allows us to identify the file and understand where it might come from
- Check it against known threats
- Make sure it hasn’t been tampered with
- Aid in detailed analysis
- Assist in incident response
- Track how the file spreads within the network.
So, where should we start? Well, now that we know which one is the malicious file so lets start with the basic search.
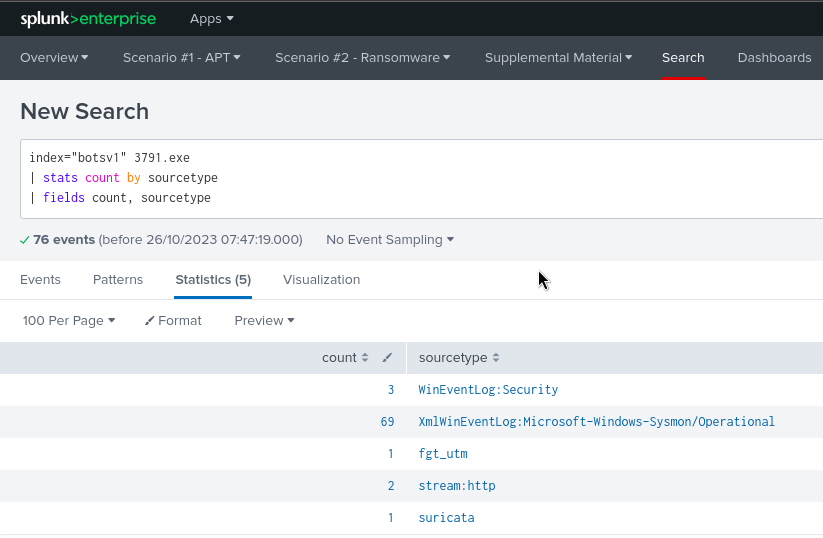
Search Query : index=”botsv1″ 3791.exe
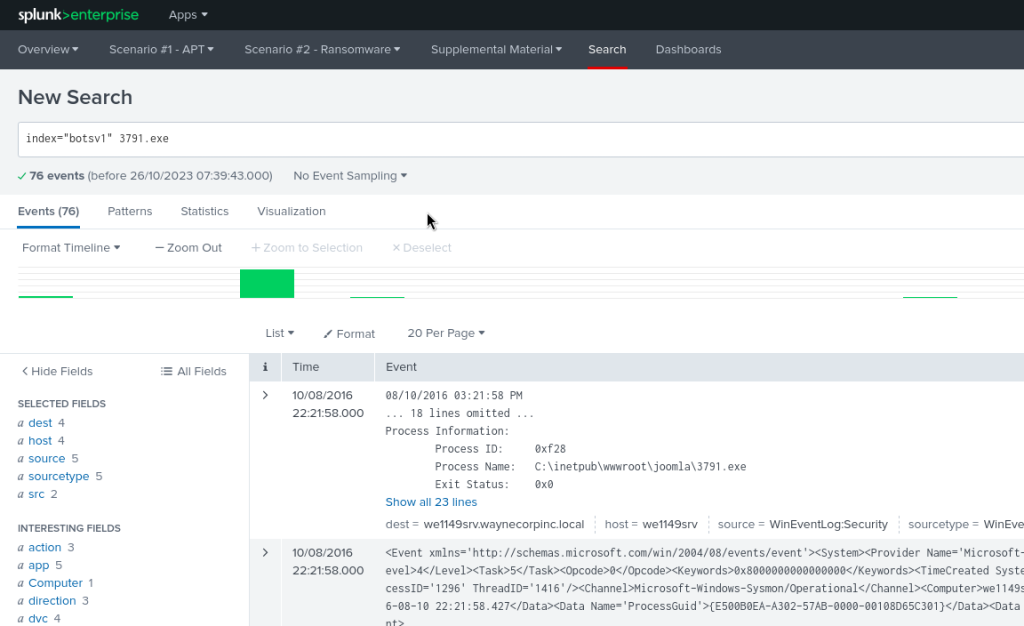
This will list everything in our dataset that is associated with this file, now our task is to find the hashes of the file.
Hmmm…..what is a place where I can find all the relevant information regarding this file and in there I will be able to get my hands on the hash.
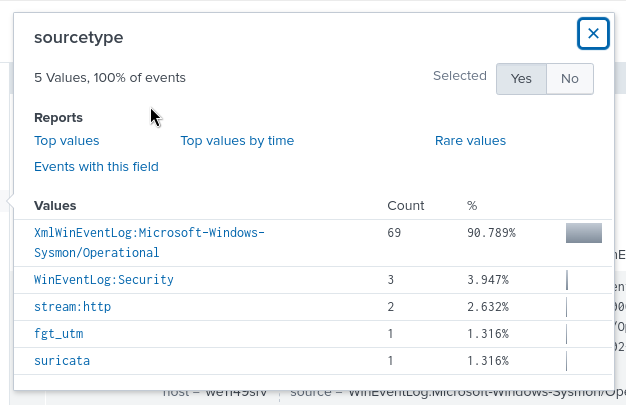
As you know in the sourcetype field, we can see that Microsoft Sysmon is listed so let’s check that out.
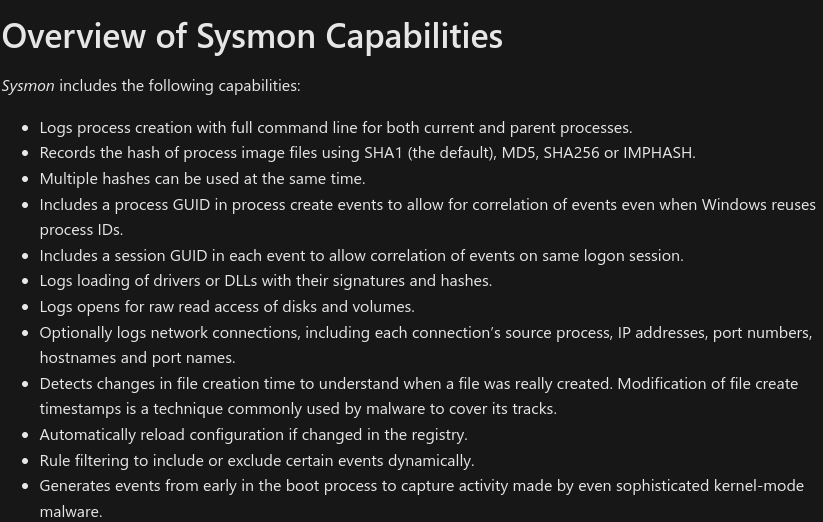
According to this Sysmon does record the MD5, SHA1 and SHA256 hashes of all the files.
So why not use it to answer our questions.
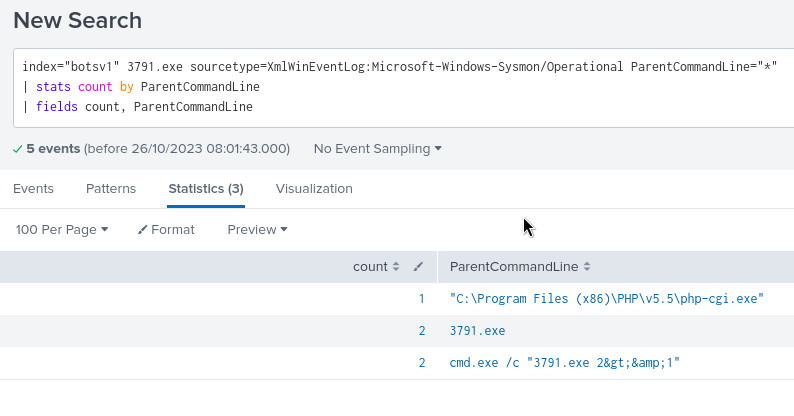
There is a method to check where a command/process originated from and we can do that with the help of CommandLine or ParentCommandLine fields.
Using this we can chain both the results of Hashes and CommandLine to come to a conclusion.
Search Query will be : index=”botsv1″ 3791.exe sourcetype=XmlWinEventLog:Microsoft-Windows-Sysmon/Operational ParentCommandLine=”*” | stats count by ParentCommandLine | fields count, ParentCommandLine
Search Query : index=”botsv1″ 3791.exe sourcetype=XmlWinEventLog:Microsoft-Windows-Sysmon/Operational CommandLine=”*” | stats count by CommandLine | fields count, CommandLine
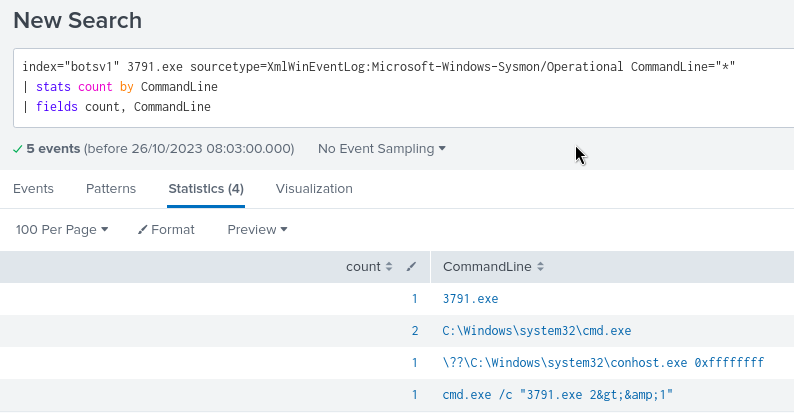
Now we want the result of the command where the malicious file was executed in the command line.
Search Query : index=”botsv1″ 3791.exe sourcetype=XmlWinEventLog:Microsoft-Windows-Sysmon/Operational CommandLine=3791.exe
We got only 1 result for this query, and we can see that the file 3791.exe was executed.

The only thing left to do now is to find the hashes for this event. You can take all the hashes if you want or filter out the relevant ones that you need.
For today, I’ll take MD5 and SHA256 hash.
Search Query : index=”botsv1″ 3791.exe sourcetype=XmlWinEventLog:Microsoft-Windows-Sysmon/Operat onal CommandLine=3791.exe Hashes=”*” | table MD5 SHA256 Hashes

There we have all the required hashes.
MD5 : AAE3F5A29935E6ABCC2C2754D12A9AF0
SHA256 : EC78C938D8453739CA2A370B9C275971EC46CAF6E479DE2B2D04E97CC47FA45D
Lockheed Martin Kill Chain –
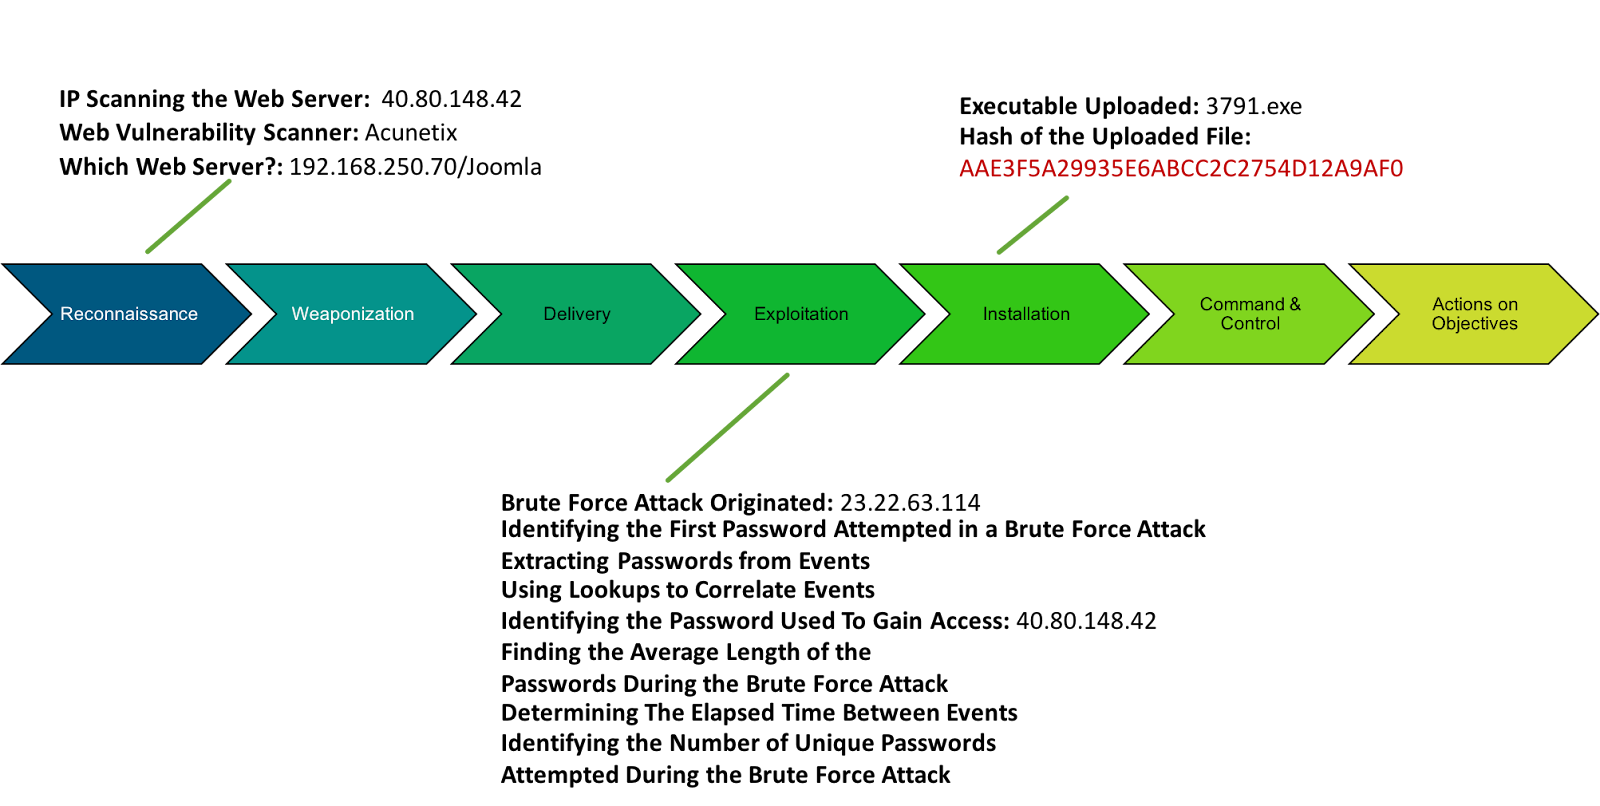
Threat Picture –
Identifying the File that Defaced Our Web Server (Part 1-2)
In the next step of our investigation we are supposed to figure out the specific file that caused the defacement of our web server.
Because we know that the file had to be sent/uploaded to our web server, let’s start by keeping it as our destination.
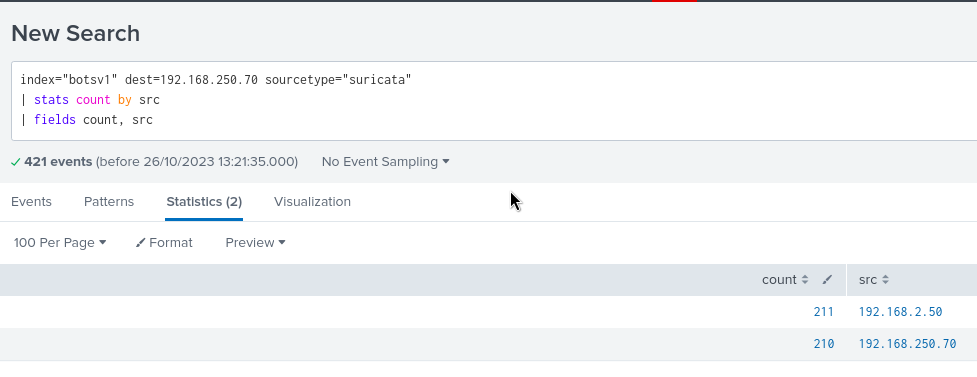
In these results our web server is only being communicated by internal hosts. Although this doesn’t really give us anything, we can switch the results by making our web server as source, then we’ll be able to get a glimpse of all the outbound connections made from our web server.
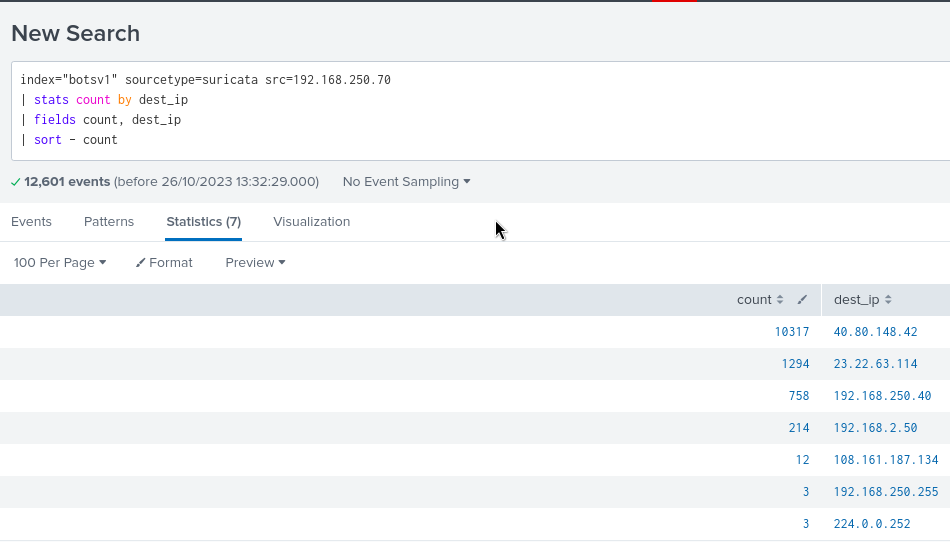
Now we get a lot more information than earlier, and we can see all the connections that were made from our web server.
One thing to notice here is that there are connections made to 3 external IPs also which is unusual. And it is unusual because it is a web server we are talking about in this scenario, which has no need to connect to outside devices and make outbound requests.
Those external IPs are :
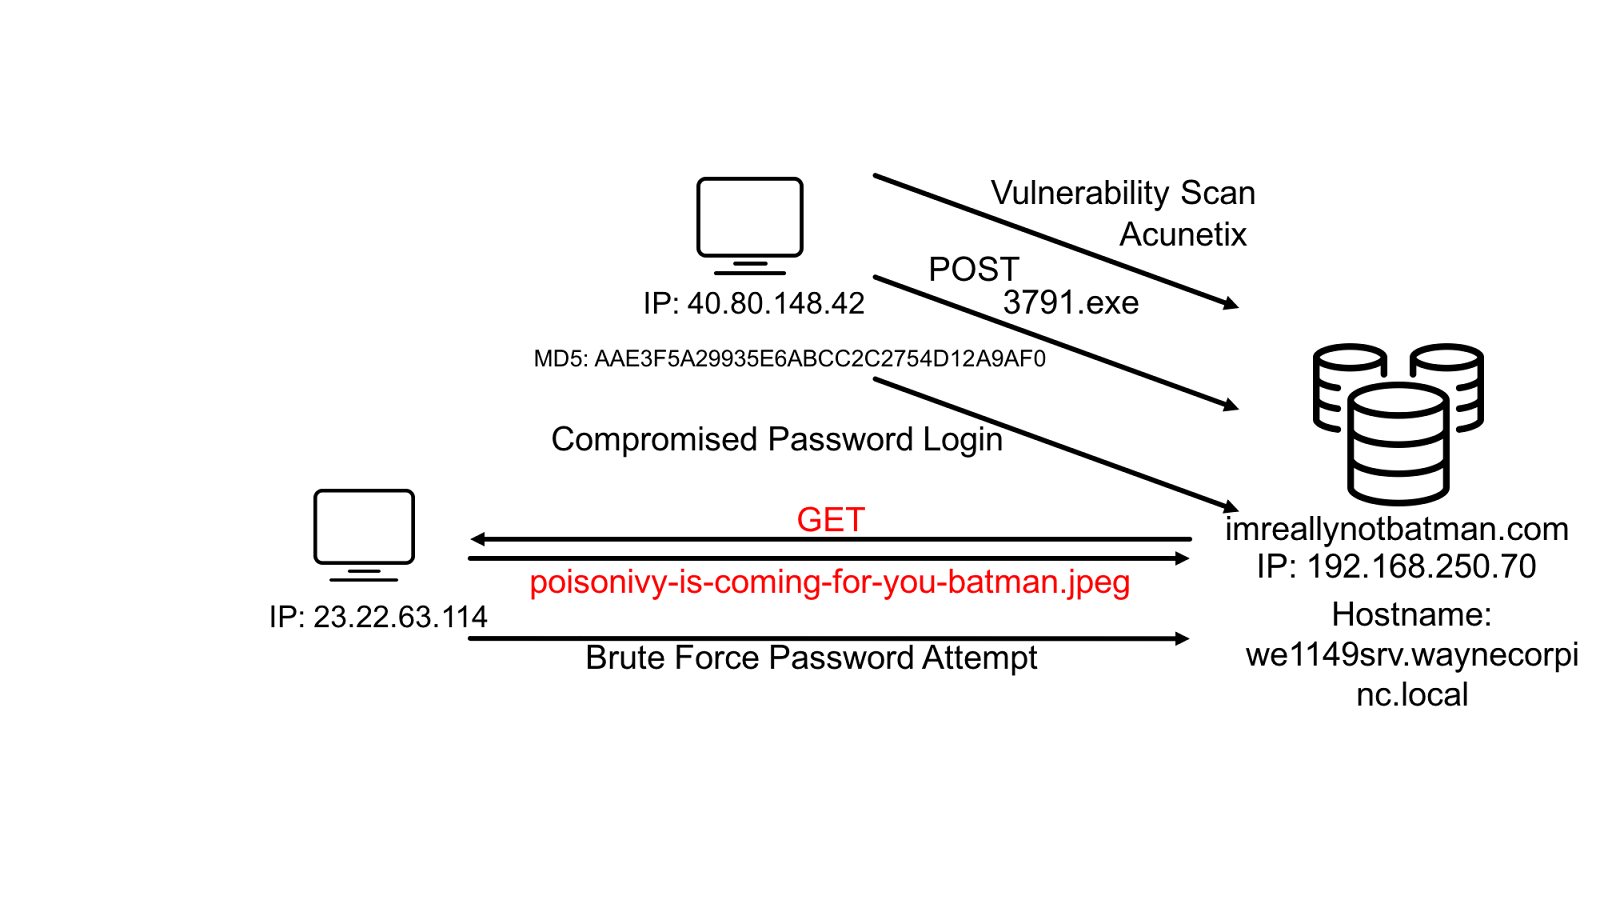
- 40.80.148.42
- 23.22.63.114
- 108.161.187.134
We already know that two of these IPs are associated with the APTs where we found 40.80.148.42 was the IP that was used to perform Vulnerability Scan on our web server and 23.22.63.114 was the IP where the Brute Force Attack originated earlier.
Let’s individually look at the conversation between these IPs and our web server.
- 23.22.63.114
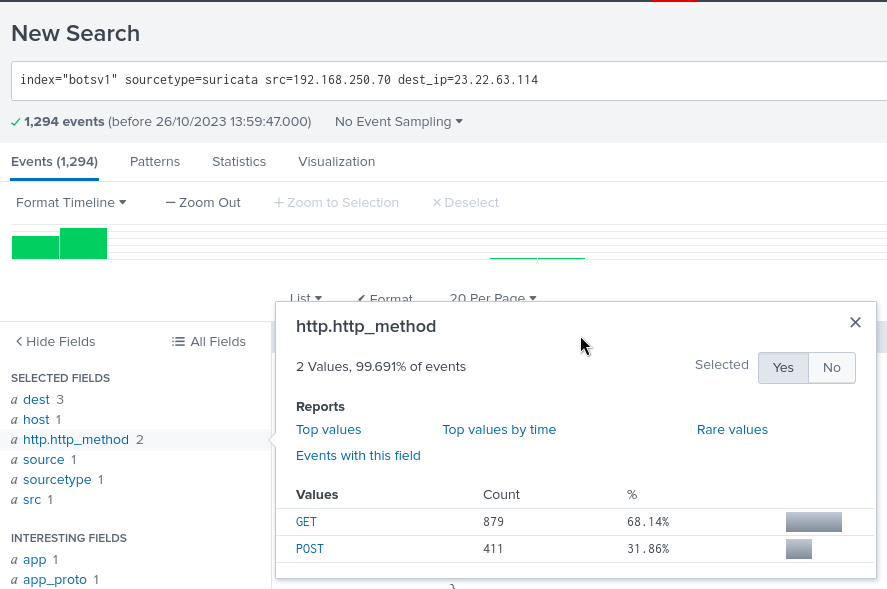
We can see that there are a lot of requests that use the HTTP GET and HTTP POST method. Let’s go ahead with GET requests because those are almost double in numbers than the POST method.
Search Query : index=”botsv1″ sourcetype=suricata src=192.168.250.70 dest_ip=23.22.63.114 | stats count by http.url | fields count, http.url
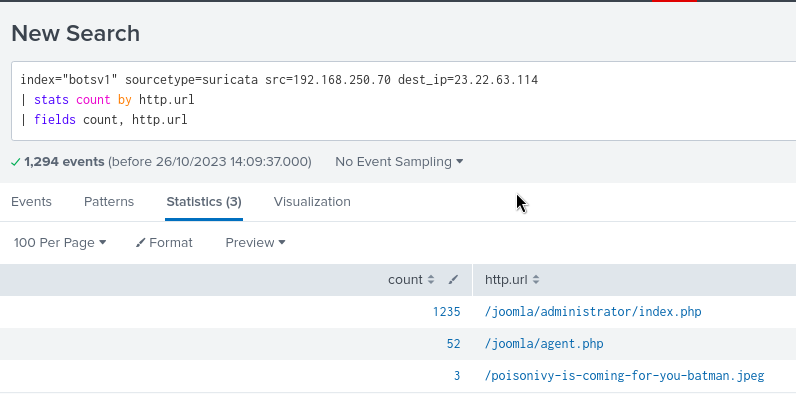
We can see that there is one request which is quite interesting, and yes it is the last one that says “/poisonivy-is-coming-for-you-batman.jpeg”.
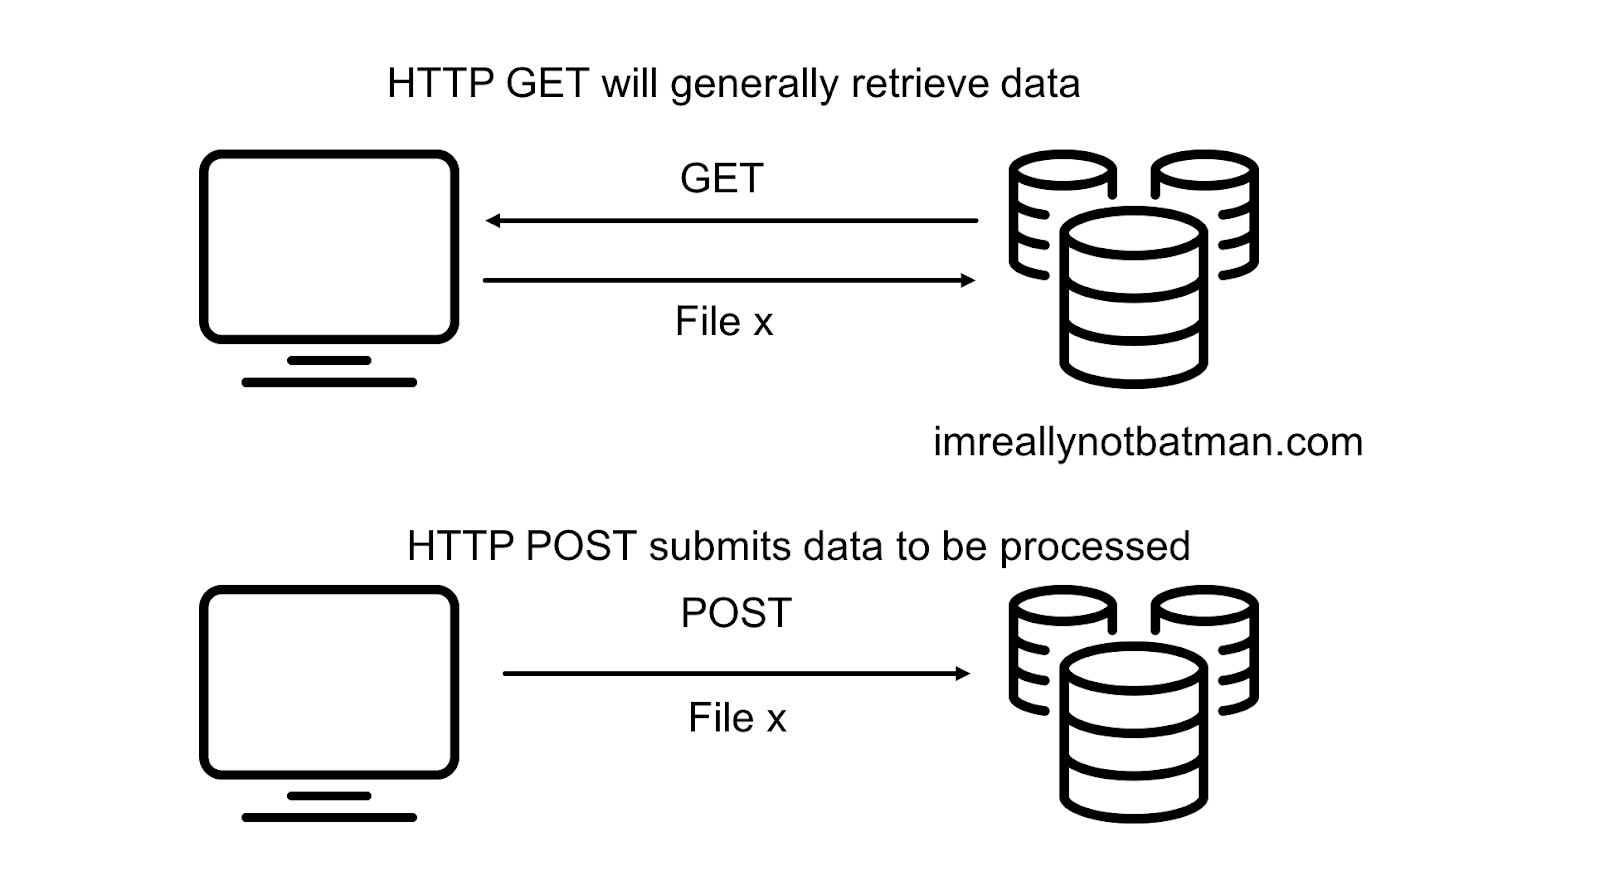
This image explains the general flow of data in web requests using the GET and POST method.
First you can see that while using the GET method, a request is generated from the client side and then the web server replies back with the requested data.
Whereas in the case of POST method, there is no reply back from the web server and the data which is passed from the client stays with the web server.

Here we can see that there are a total of 9 connections generated from our web server which indicates that some data is sent back to whoever was in contact with it.
We can look into the URI fields to get a deeper understanding of the data sent and received.
Search Query : index=botsv1 sourcetype=stream:http src=192.168.250.70 uri=”*” | stats count by uri | fields count, uri | sort – count

We can again see that same file listed (3rd one) in the uri field and it tells us that it might be the file which was used to deface our web server.
Lockheed Martin Kill Chain –
Threat Picture –
Validating Using Firewall Logs the File that Defaced Server (Part 2-2)
Now in this section we are supposed to validate or confirm our findings that the file which we think is suspicious is actually the one that caused the defacement or not.
For that we can use Firewall logs as it is likely that we can get some more information about this data transaction in there.
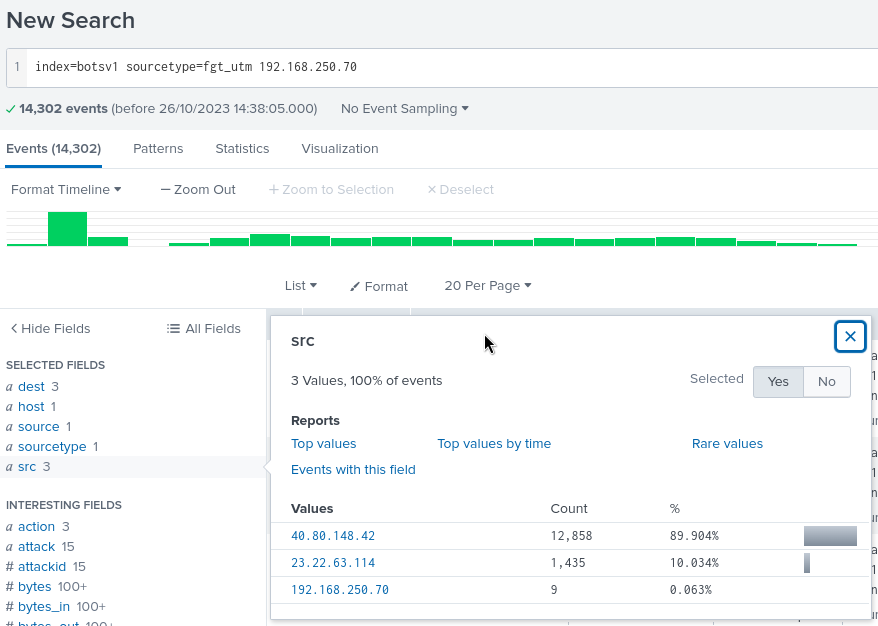
Search Query : index=botsv1 sourcetype=fgt_utm 192.168.250.70
With this simple search we have so much interesting data to analyse, let’s look at both source and destination.

Now for a fact we know that the file we are trying to validate is part of a data request that was generated from our web server so we need to assign a query which will identify all the events where the IP of the web server was involved but it wasn’t the destination.
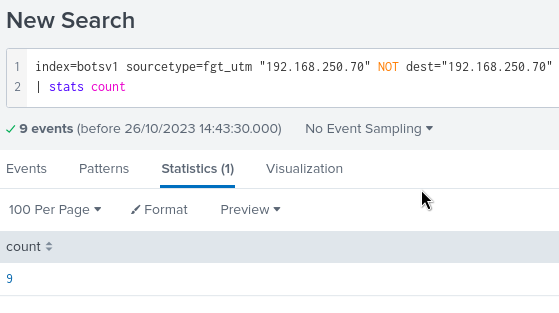
We can see there are a total of 9 such events, which is something that seems familiar as we already saw it earlier.
For further exploration of these 9 events we want to filter them by their category and so we’ll use the Category field.
Search query : index=botsv1 sourcetype=fgt_utm “192.168.250.70” NOT dest=”192.168.250.70″ category=”*” | stats count by category | fields count category

It is to be noted that all the 9 events were distributed in only 2 categories namely : Information Technology and Malicious Websites.
It is quite obvious that the 2nd category i.e. Malicious Websites with 3 events look suspicious.
Search Query : index=botsv1 sourcetype=fgt_utm “192.168.250.70” NOT dest=”192.168.250.70″ category=”*” category=”Malicious Websites” file_path=”*” | stats count by file_path | fields count file_path

This confirms that the file used for defacement of our website is “/poisonivy-is-coming-for-you-batman.jpeg”.
Lockheed Martin Kill Chain –

Threat Picture –

Identifying the FQDN of the System that Defaced the Web Server
Basically in this section we have to figure out the FQDN for the system that was used to execute the defacement of our web server.
It is nice that we now know the name of the file that was used for defacing our web server, so now we can just go ahead and search for all the events that have any involvement with this file.
Search Query : index=botsv1 poisonivy-is-coming-for-you-batman.jpeg
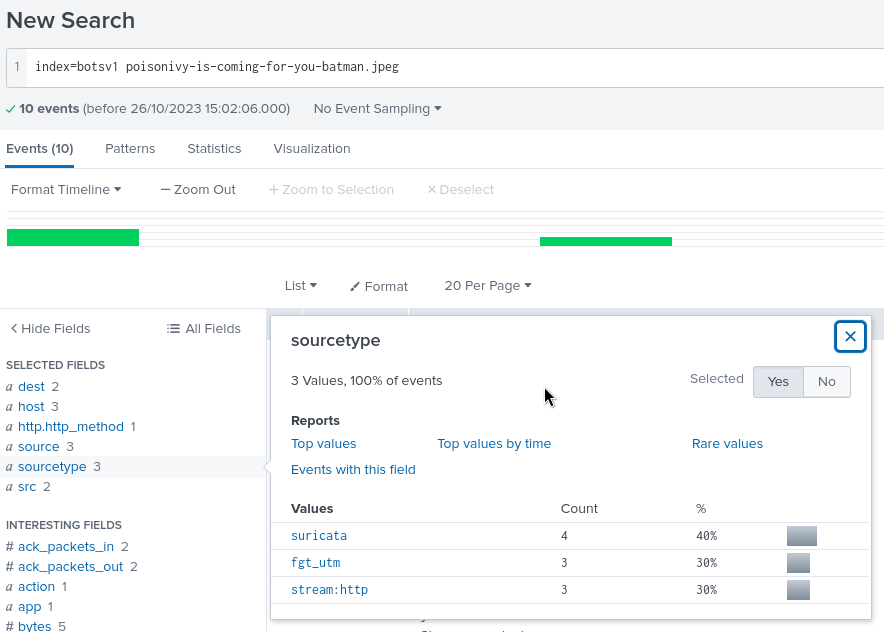
If we look at the sourcetype for this file we can see that apart from Fortigate Firewall there is also Suricata and Stream:http which indicates that there are some instances of this file within those sourcetype also.
Because our task is to find the FQDN, I am going to go ahead with stream:http as it will give us results related to the web.
Search query : index=botsv1 poisonivy-is-coming-for-you-batman.jpeg sourcetype=”stream:http” url=”*” | stats count by url | fields count url

We get the FQDN as : http://prankglassinebracket.jumpingcrab.com/
Lockheed Martin Kill Chain –

Threat Picture –

Using OSINT to Identify Attacker Infrastructure
You may ask, “OSINT in Threat Investigation?” and with everything taken into account, it does seem like a valid question.
Now using OSINT means tapping into publicly available information from various sources to better understand potential threats. It helps us see the bigger picture by providing insights into who might be behind the threats, how they operate, and the digital tools they use.
This broader perspective is incredibly useful in identifying and responding to security issues. So, OSINT is like our extended vision, helping us stay one step ahead of all threats.
And to achieve this, in this task we’ll take use of following services :
Resources
Let’s start with Robtex.
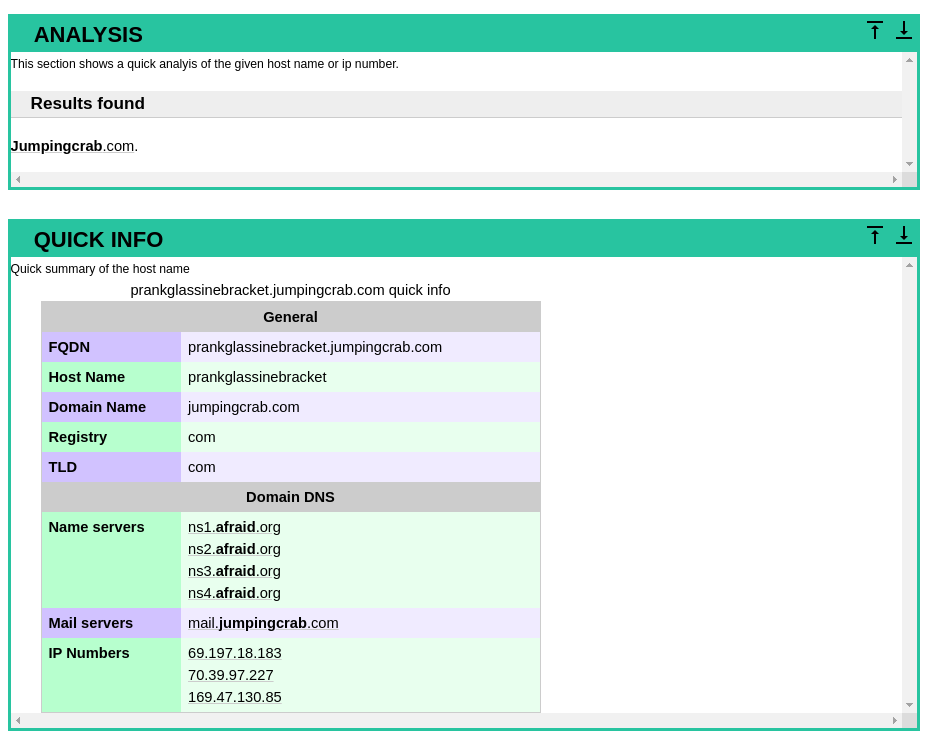
Applying the malicious IP : 23.22.63.114 into Robtex to gather more information

I tried ThreatCrowd but there seems to be some issue with the service as of now.

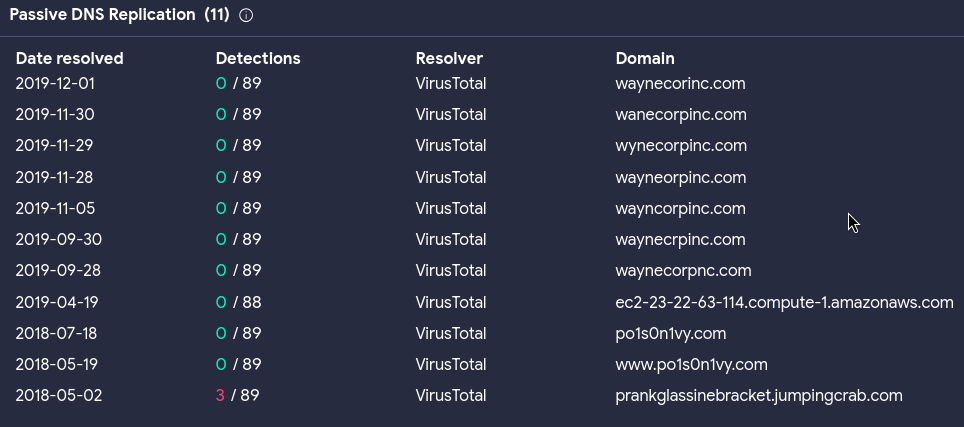
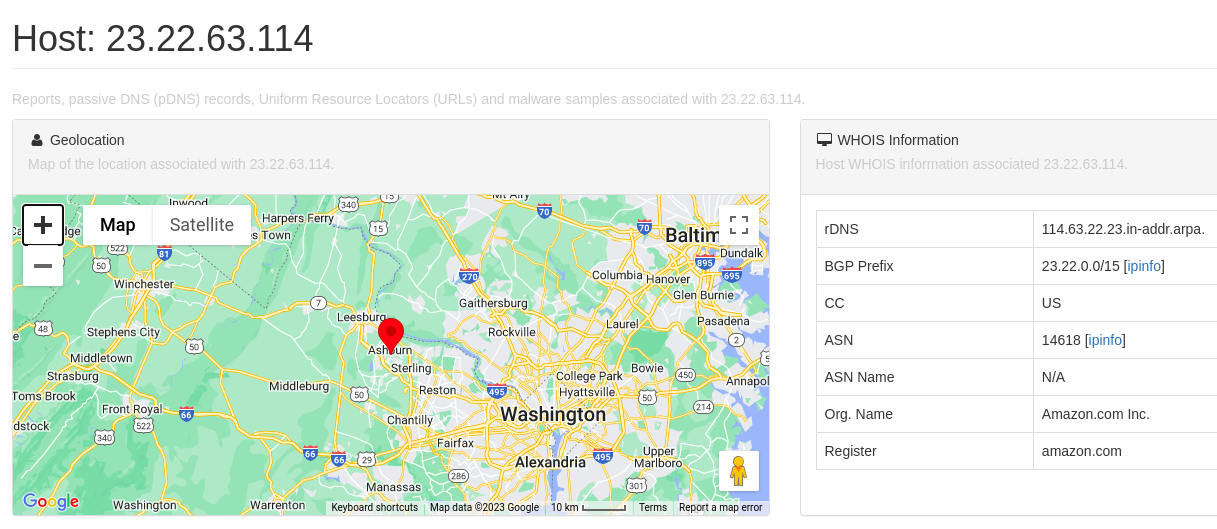
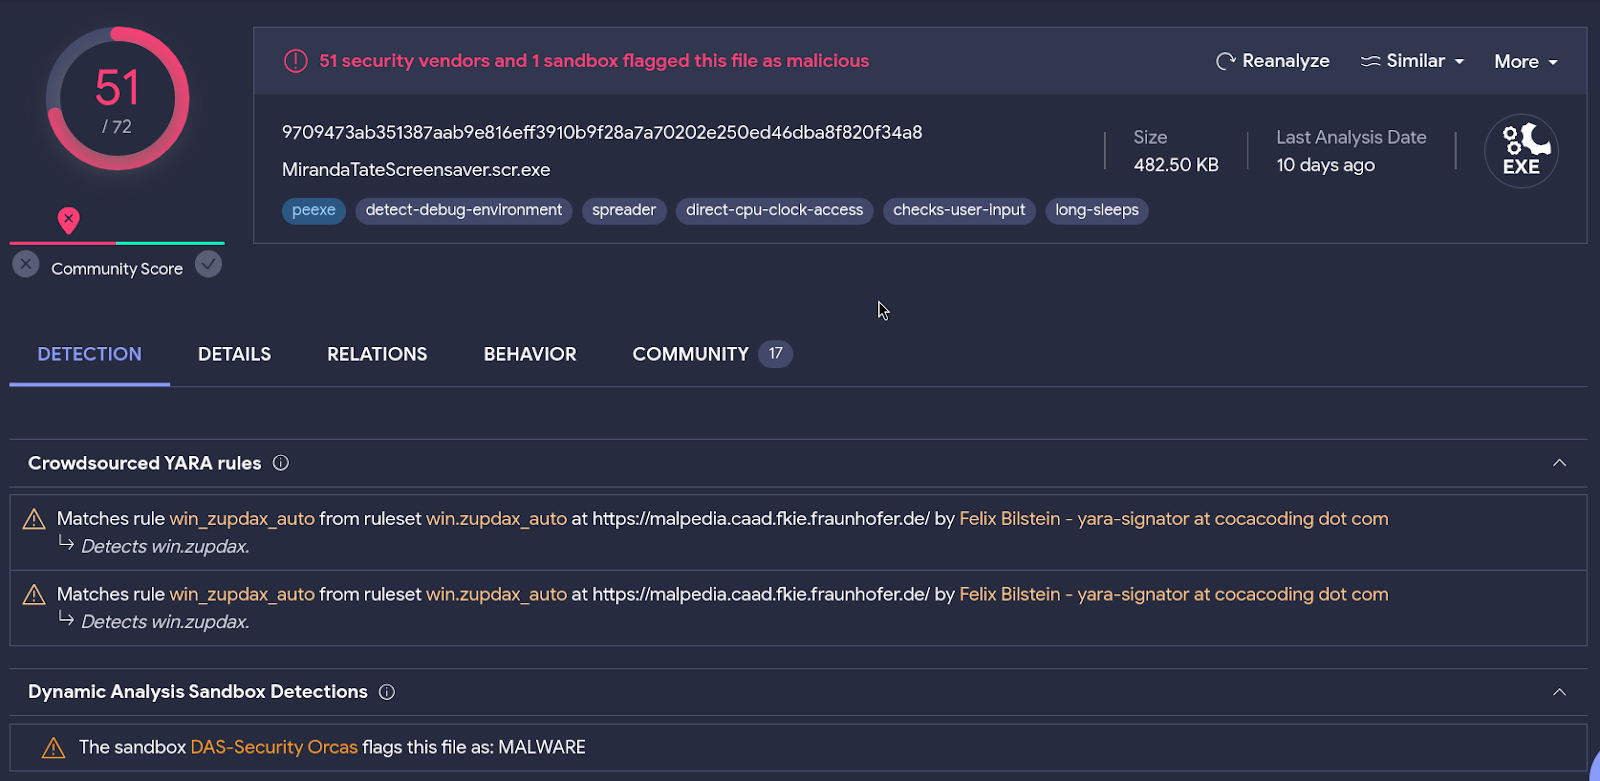
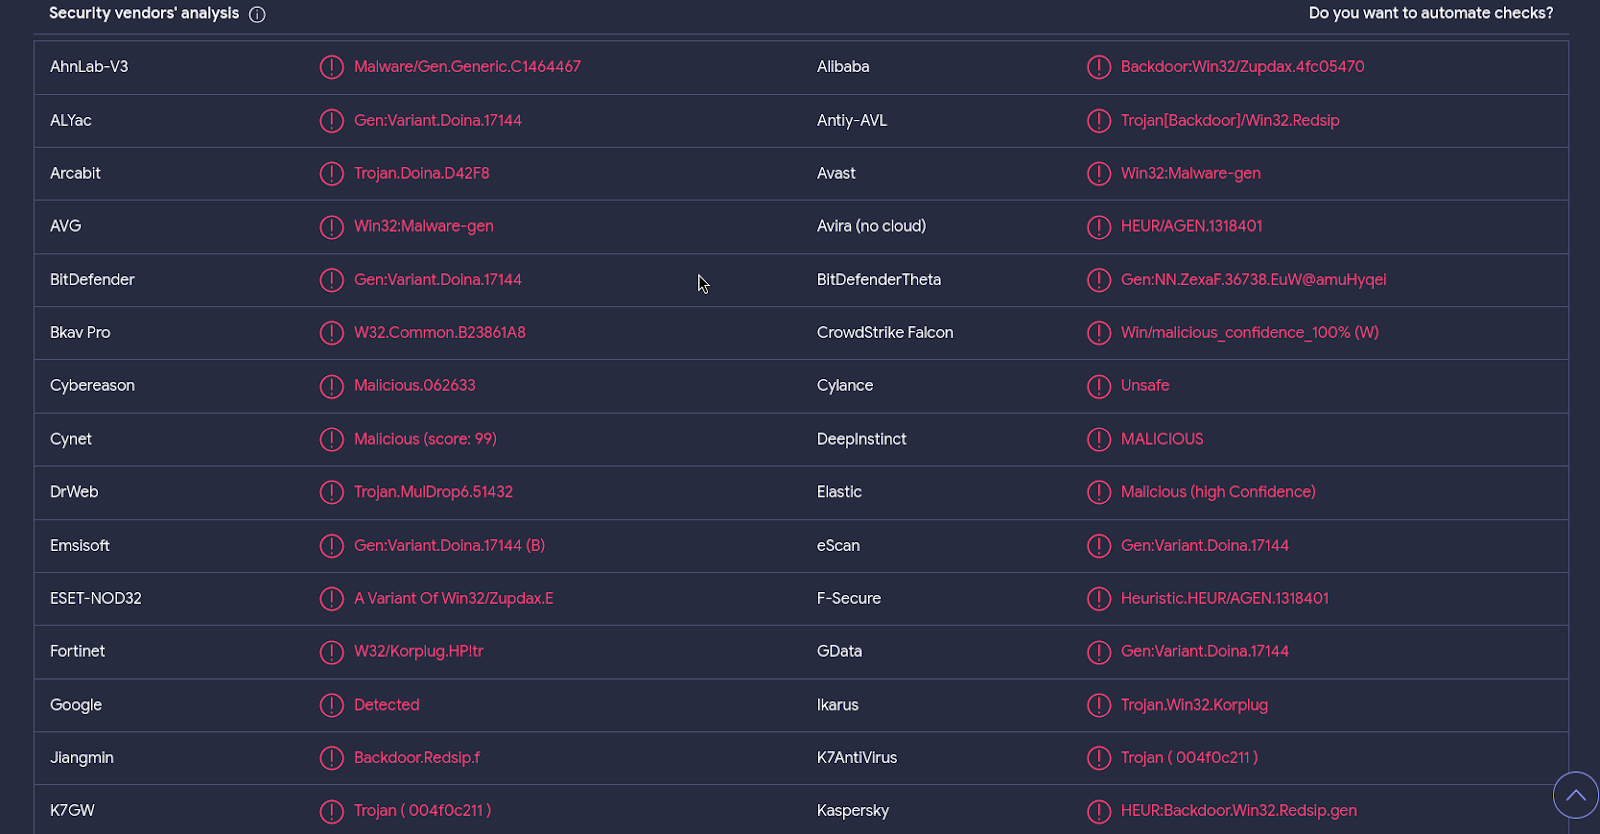
The final option is to rely on VirusTotal’s search result. Upon putting the malicious IP and FQDN in virustotal I received this.
The graph for FQDN :

Detection Screen for FQDN :

Relations Screen for Malicious IP :
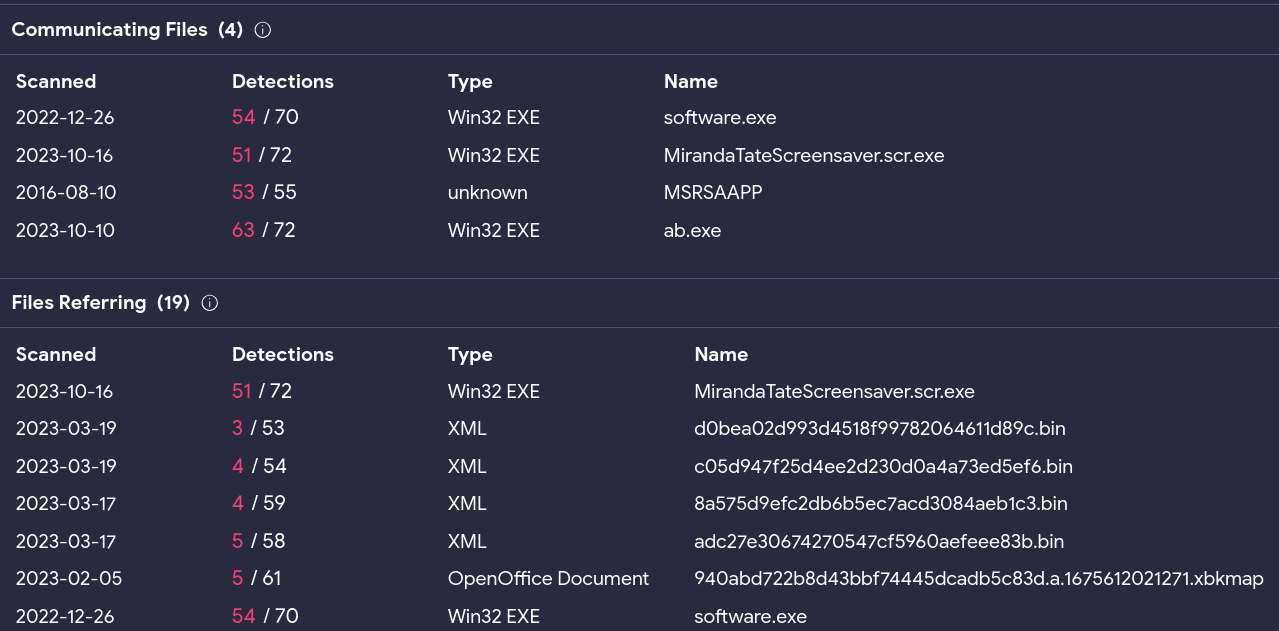
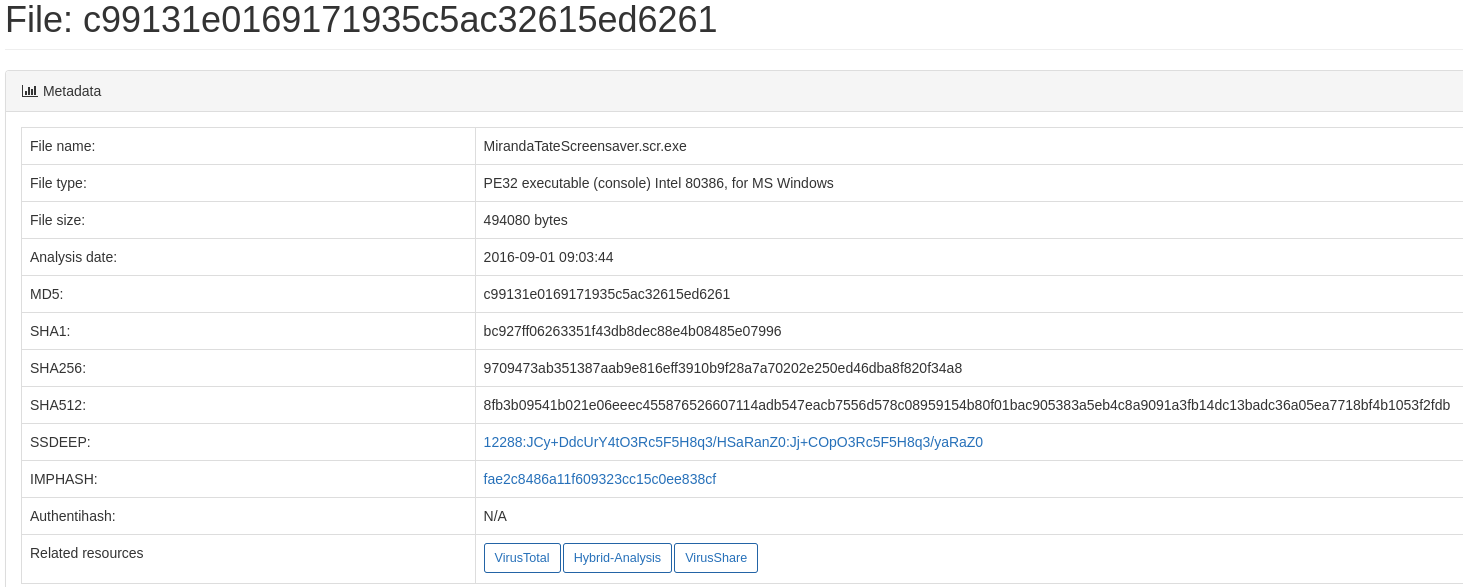
Files information :
Lockheed Martin Kill Chain –

Threat Picture –

Using OSINT to Identify Associated Malware
Resources
First of all, using ThreatMiner to investigate any malware associated with the malicious IP.
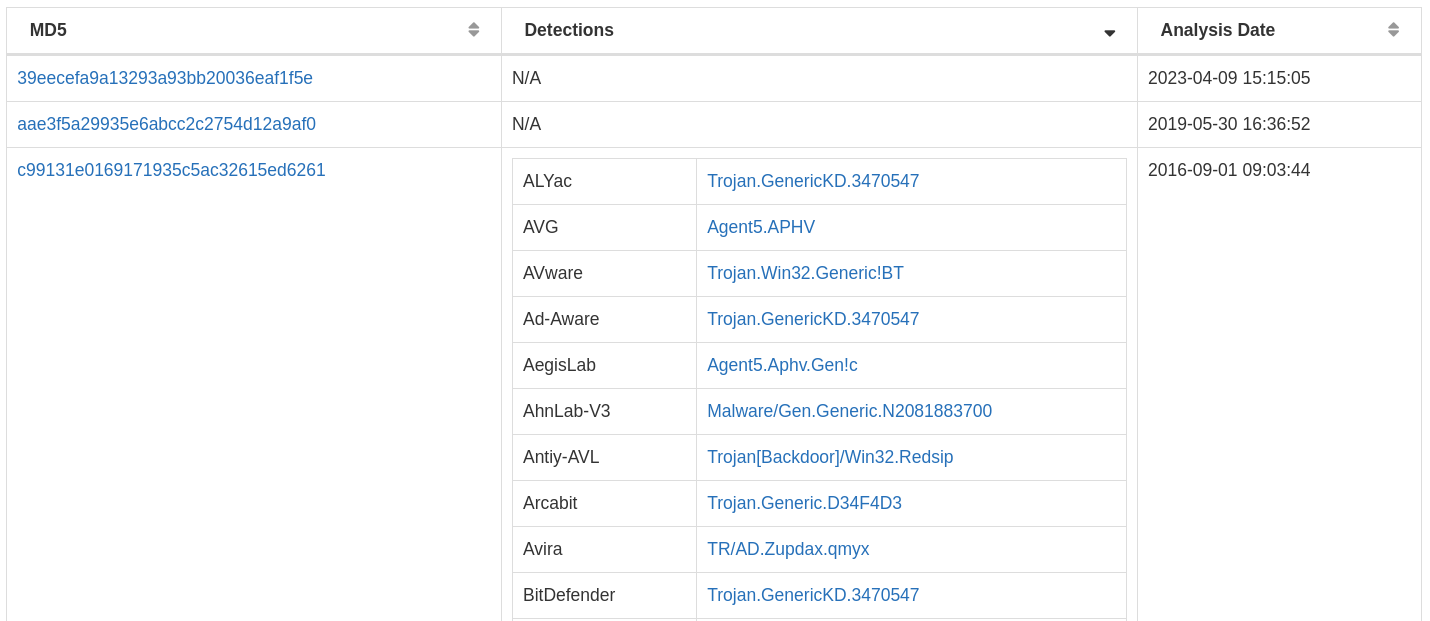
Upon searching the hash we got in VirusTotal, we received this result.
Taking our findings into account, we can come to a conclusion that the name of malware file is : MirandaTateScreensaver.scr.exe
Lockheed Martin Kill Chain –
Threat Picture –

So, that’s a wrap for Part Two of our APT investigation journey. We’ve delved deeper into the world of cybersecurity and continued our quest to unravel the mysteries of the APT incident at Wayne Enterprises.
If you’ve been following our journey from the start, thank you for being with us every step of the way. If you’re just jumping in, don’t forget to catch up on Part-1 for the full picture.
Thanks for reading, and see you in the next post with another great investigation.
If you’re as passionate about Cyber-Security as I am, feel free to follow me on Twitter – @ANShrivastava03 for the latest updates and connect with me on LinkedIn – Aditya Narayan to stay in the loop with my posts and insights in the world of digital forensics. Let’s continue this fascinating journey together!