
Access the Splunk Server to answer questions throughout this workshop, using the below shown server and credentials:
SplunkServer : Here
User ID: user001-splk
Password: Splunk.5
Hey everyone, today we are going to do a little project with Splunk which is a SIEM tool that we’ll be utilising to investigate an attack that was carried out recently. Now just to make it clear, this is neither an actual investigation nor is the attack real. Everything that we will be doing today is under all legal boundation and sole purpose of it is for practising the investigative skills using Splunk.
With that being said, lets start with the investigation by learning the case details.
I’m starting a cybersecurity investigation using Splunk, a powerful data analysis tool. I’ll be addressing a series of challenge questions related to the Lockheed Martin Kill Chain phases. Investigation is a key part of cybersecurity, where I’ll be using data to uncover potential threats.
The reason I’m diving into this investigation is due to a web defacement incident tied to an Advanced Persistent Threat (APT). I’m taking on the role of Alice Bluebird, a new analyst at Wayne Enterprises, tasked with figuring out what exactly happened. My tool of choice is Splunk Enterprise because it acts as a central hub for all the event data, making it incredibly handy for searching and investigating. Throughout this process, I’ll be using Splunk to gain deeper insights into the situation as I move forward.
Now go ahead and access the splunk app through the link provided above and login using the credentials. Upon successful login you should see a screen like this.
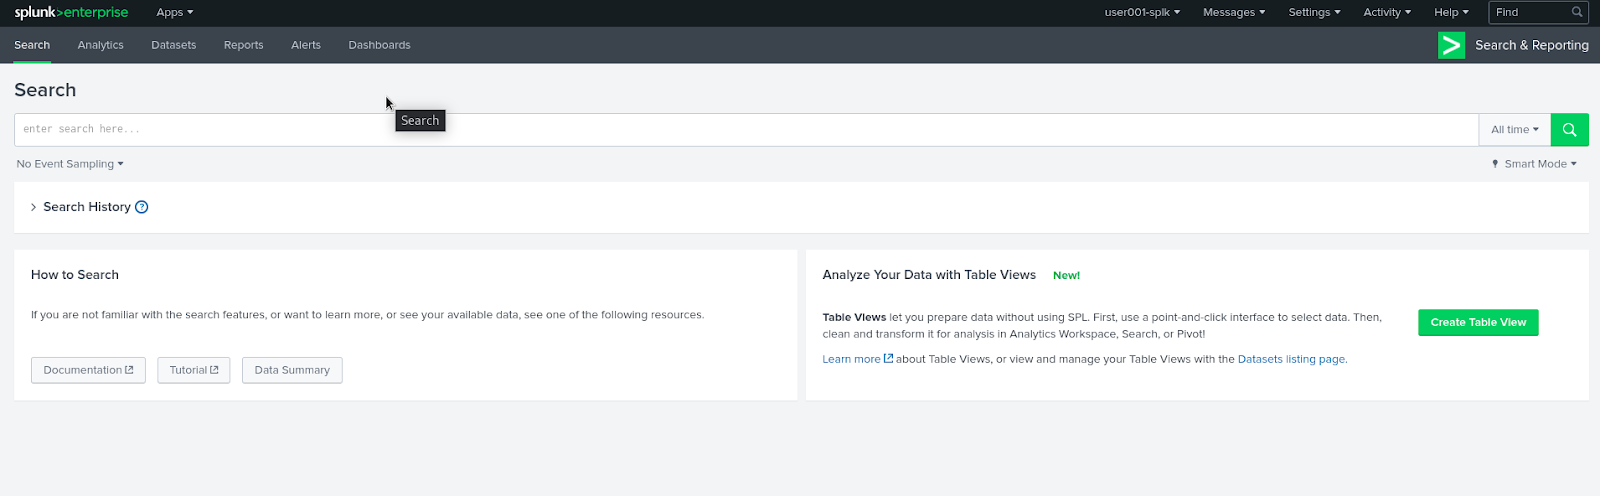
Change the app and make sure to be in “Investigating with Splunk Workshop”

Upon changing the app, your screen should like the image below.

Some things to note are :
Lab Environment and Setup –
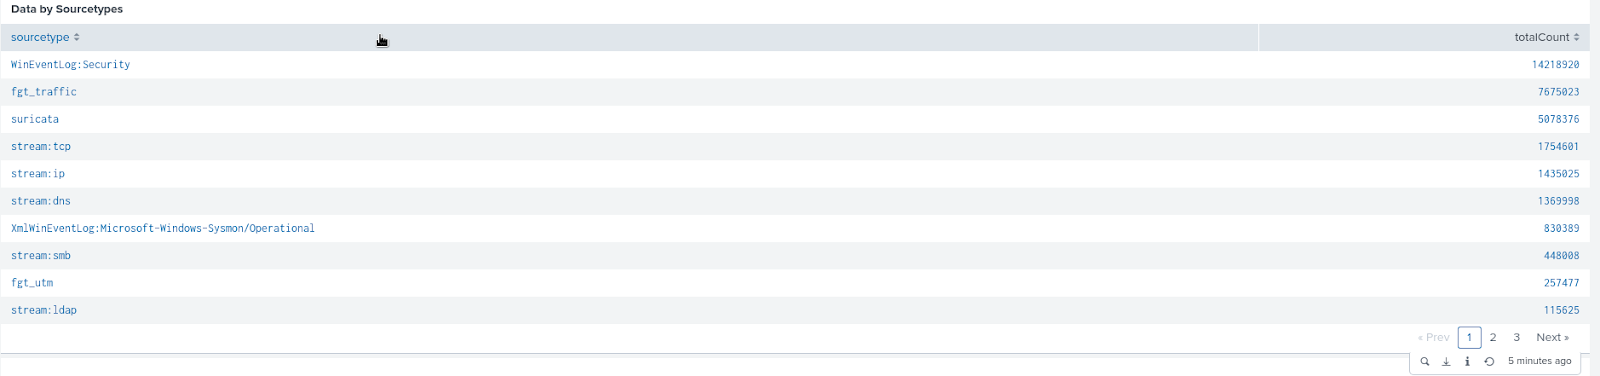
The data included in this app was generated in August of 2016 by members of Splunk’s SecPrax and Sales Engineering teams – Dave Herrald, Ryan Kovar, Steve Brant, Jim Apger, and James Brodsky. They stood up a few lab environments connected to the Internet. Within the environment they had a few Windows endpoints instrumented with the Splunk Universal Forwarder and Splunk Stream.
The forwarders were configured with best practices for Windows endpoint monitoring, including a full Microsoft Sysmon deployment and best practices for Windows Event logging. The environment included a Nessus installation for vulnerability scanning, a Fortinet next-generation firewall to capture traffic and provide web proxy services, a forensic SIFT server to perform log2timeline activities, a Stoq installation to automate file analysis, and Suricata to provide network-based IDS. This resulted in the dataset listed below.
For the APT scenario, we won’t worry about time ranges, but for the Ransomware scenario, we will focus a bit more on a narrow band of time when the incident occurred.
Data by Sourcetypes –
Supporting Apps – There are various Splunk apps and TAs loaded on this system in order to support this hands-on experience:
- Splunk Add-on For Microsoft Windows to provide extractions for Windows event logs.
- Add-on for Microsoft Sysmon to provide extractions for Sysmon output.
- Fortinet FortiGate Add-On for Splunk to provide extractions for Fortinet output.
- Splunk Stream to provide extractions for Splunk Stream output.
- Splunk TA for Suricata to provide extractions for Suricata output.
- Timeline – Custom Visualization that provides the timeline visualization in Ransomware Scenario.
- Splunk Add-on for Tenable to provide extractions and lookups for Nessus scan output.
Next page that says “What Kinds of Events Do I Have?” is going to give you a bit of background info on this event and implies the importance of metadata command from SPL in this investigation.
Resources : metadata command – Splunk Docs
Now we’ll move to the next page “APT Scenario” by clicking on the bottom of the page.
Scenario #1 – APT :
In this scenario, reports of the below graphic come in from your user community when they visit the Wayne Enterprises website, and some of the reports reference “P01s0n1vy.” In case you are unaware, P01s0n1vy is an APT group that has targeted Wayne Enterprises. Your goal, as Alice, is to investigate the defacement, with an eye towards reconstructing the attack via the Lockheed Martin Kill Chain.
Finding the IP Scanning Your Web Server (Part 1) :
By reading the background we already know that the index for this investigation is going to be “botsv1” and that we have to start with investigating the web vulnerability scanning that attackers have performed on “imreallynotbatman.com”
So we’ll start with a basic search query of “index=botsv1 imreallynotbatman.com” and then build upon it.
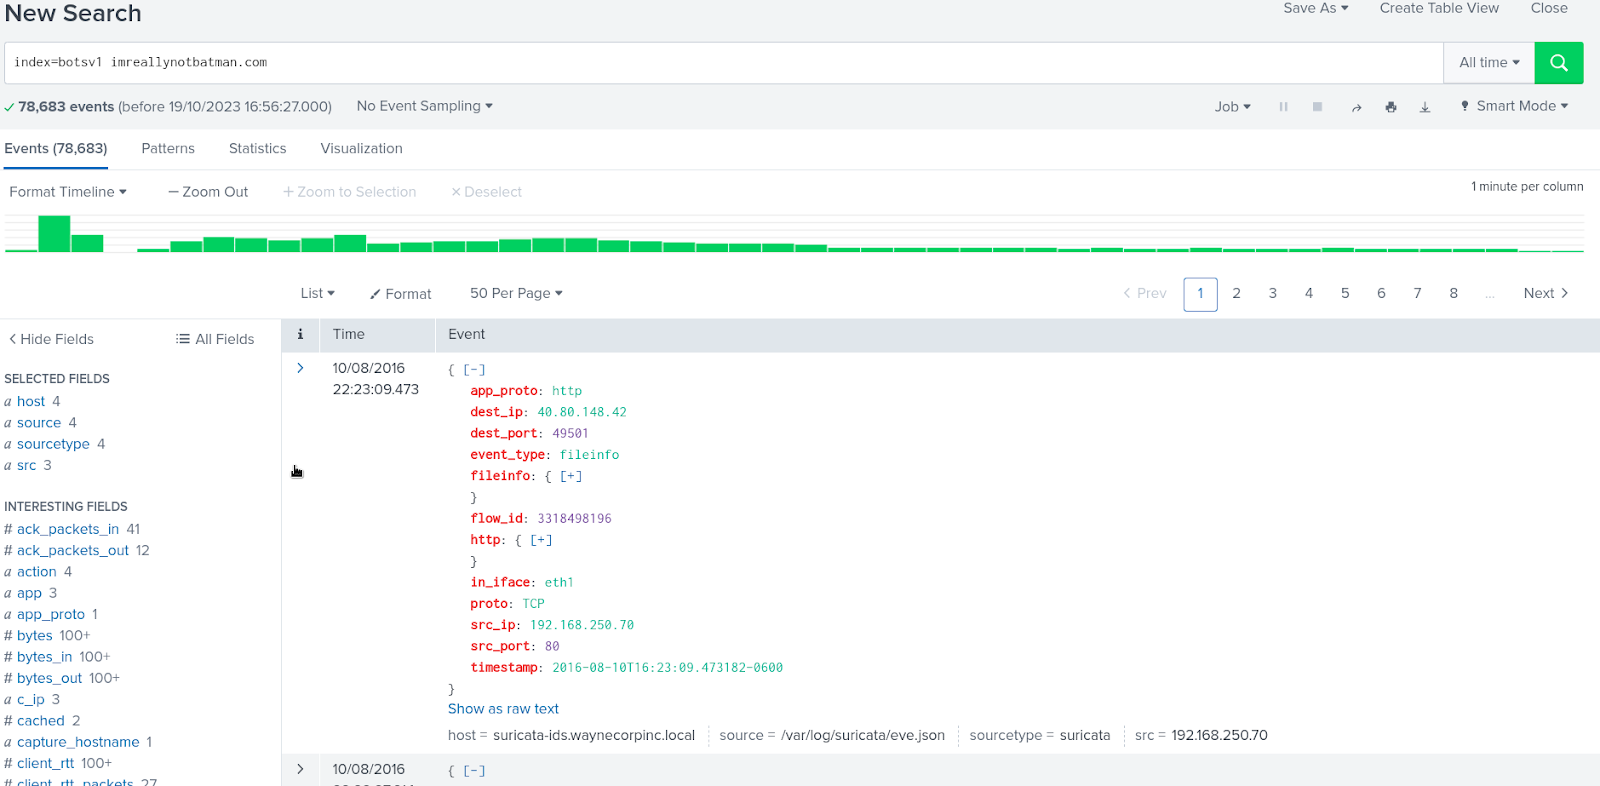

Now we need to keep the focus on finding the sourcetype and as we know that we are investigating a web vulnerability scanning so it makes sense to look into stream:http as it will show all the relevant info about the web data exchanges.
Search query will be : index=botsv1 imreallynotbatman.com sourcetype=”stream:http”
Now that we have sourcetype, we want to know what could possibly be the IP Address of the P01s0n1vy APT group. To figure that out a good indication would be a lot of requests generated from the same src, so we can count the src data available and see which source has the most number of requests.

Search query will be : index=botsv1 imreallynotbatman.com sourcetype=”stream:http” | stats count by src
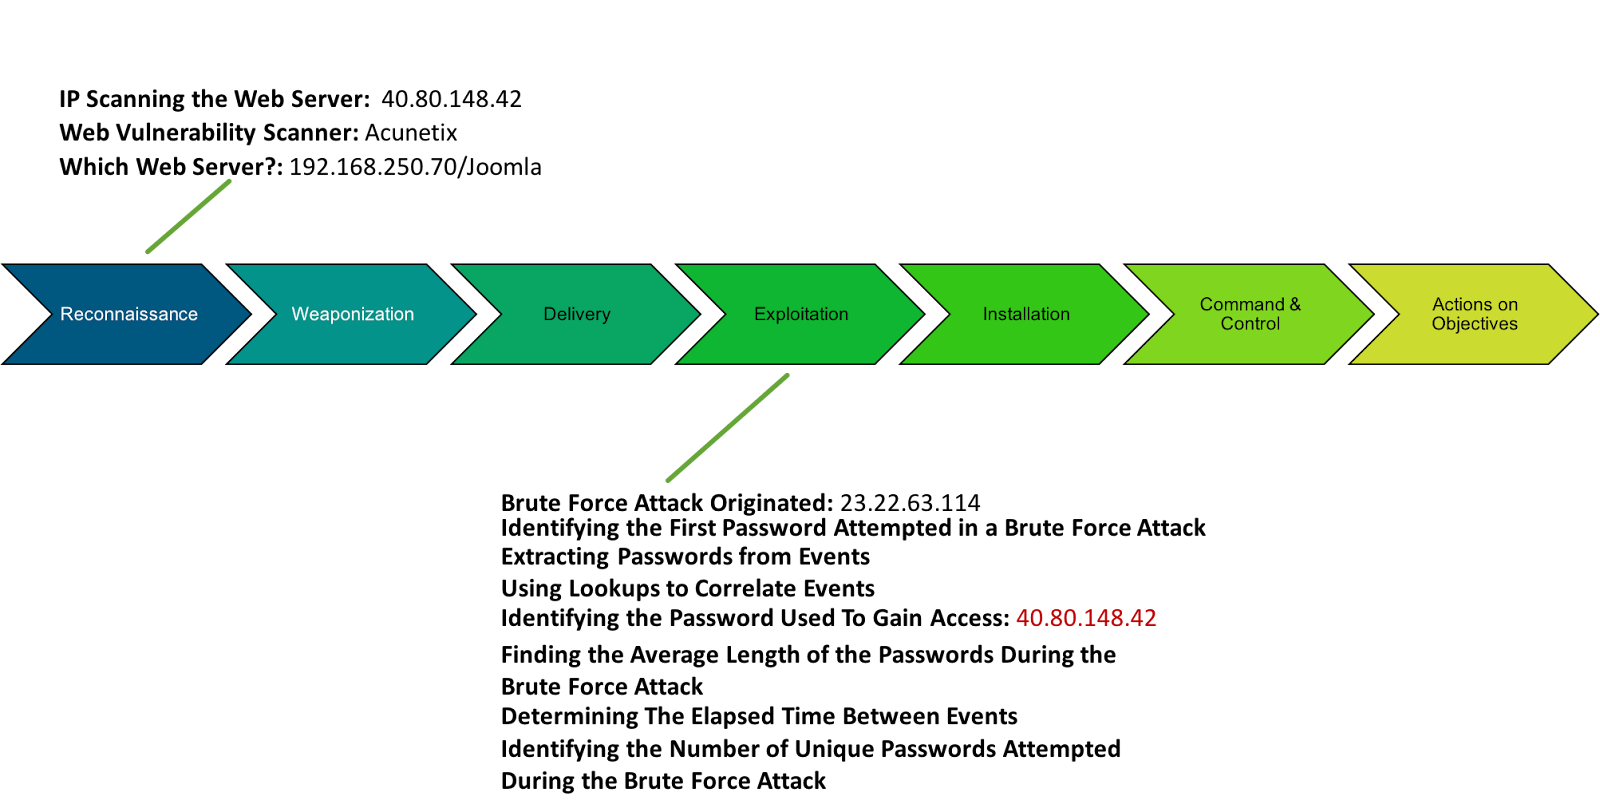
As we can see that there are 20964 requests associated with the source IP 40.80.148.42
And with that now we know that the IP Address of P01s0n1vy APT group is 40.80.148.42
Lockheed Martin Kill Chain :

Threat Picture :

Validating the IP That is Scanning Your Web Server (Part 2)
In this section we need to validate and confirm our findings which basically means that we need to check that the IP that we found is actually the IP address of someone from APT or not.
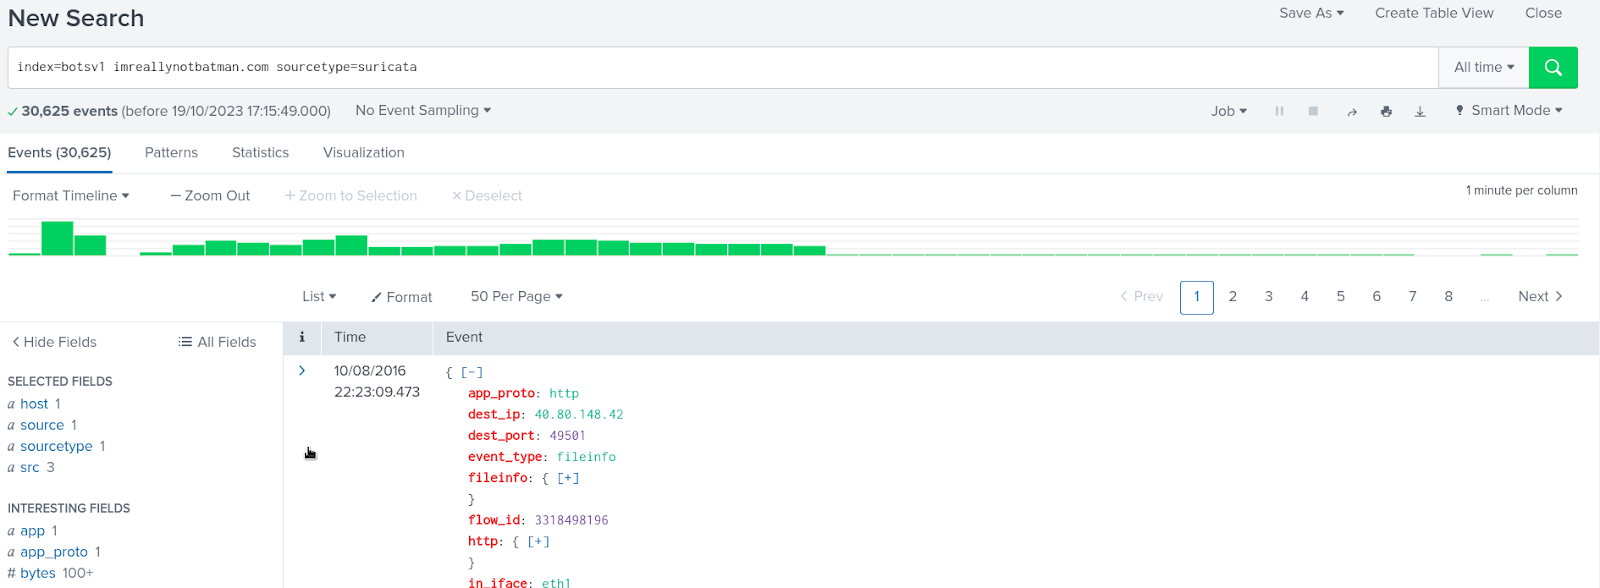
For that we need to look at the data provided by Suricata sourcetype as it will provide us signature based information for all the relevant sources.
Search query will be : index=botsv1 imreallynotbatman.com sourcetype=suricata
Now we need to search for the signature of that suspicious IP Address so we’ll use the Signature field and count according to that.

By going through the search result we can safely say that the IP Address we found to be suspicious is actually malicious and is associated with the APT.
Identifying The Web Vulnerability Scanner
As the title suggests, now we need to figure out what is the vulnerability scanner that was used by the APT group to scan our web application “imreallynotbatman.com”.
Search query will be : index=botsv1 imreallynotbatman.com src=”40.80.148.42″ | stats count by src_headers | sort – count
In order to identify the name of the vulnerability scanner a good place look at will be the source headers as they might contain the relevant info related to the requests sent from the malicious IP Address.
The search query will filter and count the result by the src_header field and then sort it in a descending order.
Then we can just go ahead and look into each of the results to eventually get the name of the scanner used. For demonstration purposes I’ve searched it into the browser which will highlight it and make it easy for you to see it.

The vulnerability scanner that was used to assess the vulnerabilities on the sites of Wayne Enterprises is Acunetix Web Vulnerability Scanner.
Lockheed Martin Kill Chain –

Threat Picture –

Determining Which Web Server is the Target
In this section we are supposed to figure out the underlying technologies on our system and apply appropriate patches in order to secure it and prevent any future mishaps.
Let’s start with finding the victim and their associated IP Address. An easy way to do this is to look who is receiving the requests sent from the malicious IP.
If the malicious IP is the source IP and it is trying to hack the web application then the victim will be the destination IP.
Search query will be : index=botsv1 imreallynotbatman.com src=”40.80.148.42″ sourcetype=”stream:http” | stats count by dest

In the above screenshot we can see that the IP Address : 192.168.250.70 has received the maximum amount of requests originating from the malicious IP.
This IP has to be the IP of the web server where the web application “imreallynotbatman.com” is hosted and hence is targeted by the APTs.
Now our task is to figure out the CMS associated with this web server and for that we can make a simple search with the help of uri field which is going to give us relevant info regarding the web URLs associated with this IP Address.
Search query will be : index=botsv1 imreallynotbatman.com dest=”192.168.250.70″ sourcetype=”stream:http” | stats count by uri | sort – count | fields count, uri

By analysing this we can come to a conclusion that terms Joomla as the CMS used in web applications of Wayne Enterprises.
Lockheed Martin Kill Chain –

Threat Picture –

Identifying Where a Brute Force Attack Originated
We are supposed to look for the IP address that is possibly attempting a brute force attack against the server that our website is hosted on, so starting with looking at the results of stream:http as sourcetype might be a good idea because we know Brute force is a web based attack and so all the communication will happen through web only.
Let’s start our search by looking into web results and specifically those ones where the destination was our web server.
Search query will be : index=botsv1 sourcetype=”stream:http” dest=”192.168.250.70″ | stats count by src | sort – count

We can see that most of the requests are coming from the malicious IP Address that we discovered earlier, and now our next step should be to determine the method of web requests that are being sent.
For that we’ll use the http_method field which will allow us to see the method of each of those requests.
Search query will be : index=botsv1 sourcetype=”stream:http” dest=”192.168.250.70″ http_method=”POST” | stats count by src | sort – count
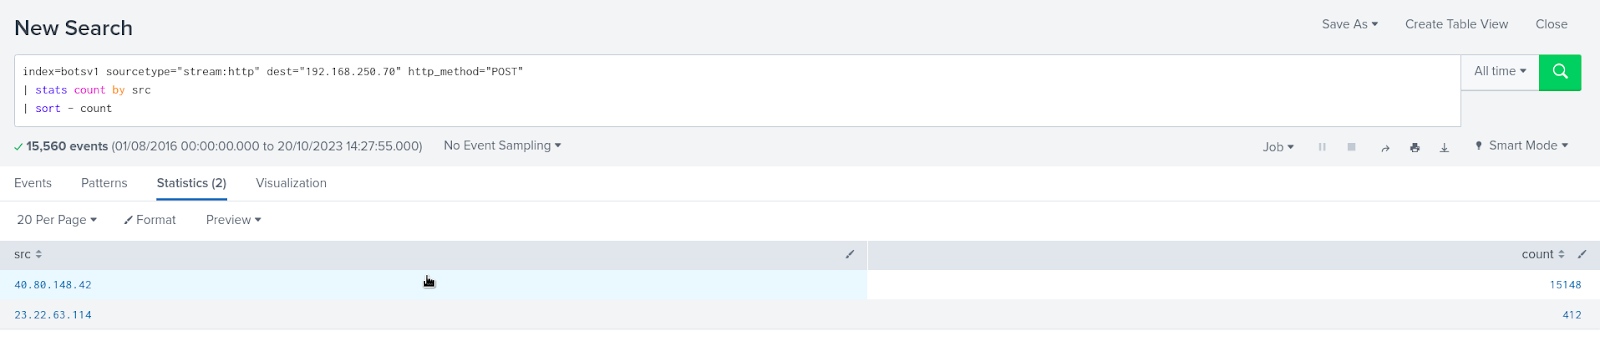
By understanding the working of Brute Force attacks we know that the request method needs to be POST in order to submit the form.
In the results we can see that 2 sources are listed and a huge amount of requests are associated with the malicious IP.
Okay, now we have all the source addresses that are sending web requests using POST method to our web server which could be an indication of the Brute Force attack.
In order to narrow down our result and point to a specific source that attempted this attack, we can take a look at the request data. How can we do that? By using the form_data field.
Search query will be : index=botsv1 sourcetype=”stream:http” dest=”192.168.250.70″ http_method=”POST” form_data=*username*passwd* | table form_data

This will show us all the data of forms that contain the keywords username and password in them. By doing so we can narrow down our results to only those requests which are made when attempting to login.
Next step for us will be to figure out what source address sent, what requests and how many.
Search query will be : index=botsv1 sourcetype=”stream:http” dest=”192.168.250.70″ http_method=”POST” form_data=*username*passwd* | stats count by src | fields count, src

Looking at the result we can see that the IP address 23.22.63.114 has made 412 login attempts and the malicious IP has attempted only 1 time.
This brings me to the conclusion that the brute force attack was carried out by the IP Address 23.22.63.114 and after getting a successful login, the APTs tried to login through the malicious IP.
Lockheed Martin Kill Chain –

Threat Picture –

MITRE ATT&CK –

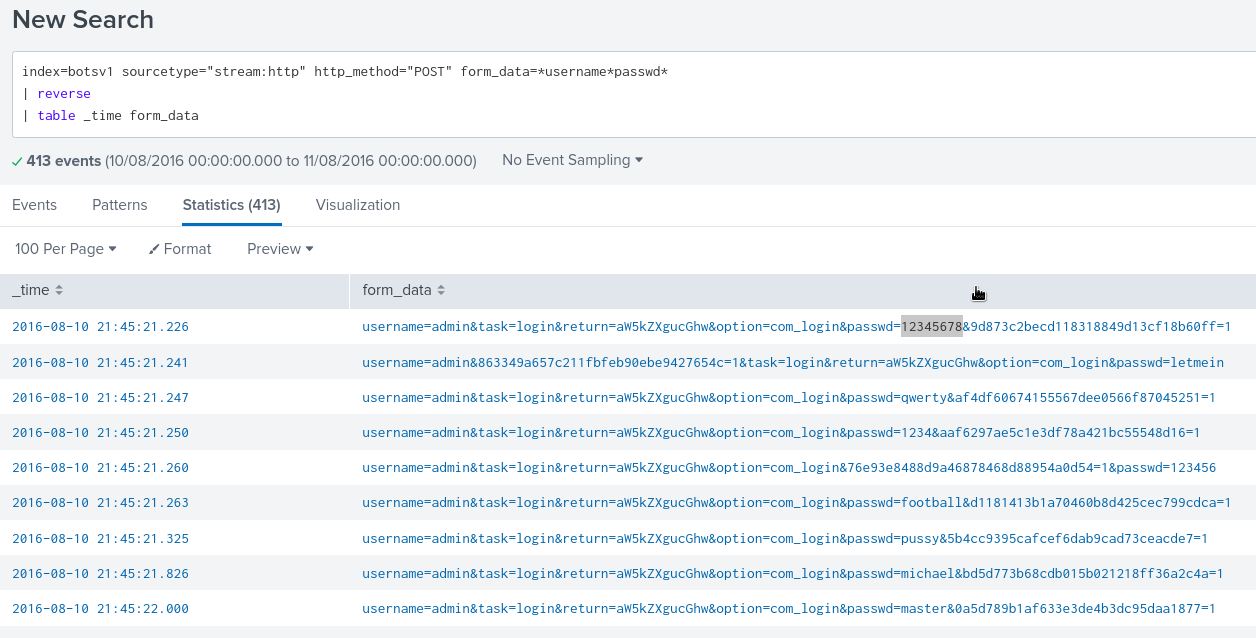
Identifying the First Password Attempted in a Brute Force Attack
For this we need to first determine all the form_data and then among them we need to filter it according to time. So the request which is going to be the oldest is going to be the first password that was attempted in that brute force attack.
Search query will be : index=botsv1 sourcetype=”stream:http” http_method=”POST” form_data=*username*passwd* | reverse | table _time form_data
Identifying the Password Used To Gain Access
In this section we are supposed to find the actual password which was successful during the brute force attack and the APTs eventually used it to login into the CMS of “imreallynotbatman.com”.
For that we first need to again look for all the form data that has keywords “username” and “passwd” in them. After that we should filter them to show only those ones where our web server is the destination.
The results that we got from this should give us all the relevant information about those requests, but there is still one step left to distinguish the successful password login attempts from the other failed password login attempts.
For that we need to check that both the IP Addresses that we have found to be suspicious are using that same password to login, it makes sense in a brute force attack environment that an attacker would only use a single password more than once if that is the correct password.
And we already know that one attempt was done from the malicious IP so we should get a password that is used by both the following IP Addresses : 23.22.63.114 and 40.80.148.42
Search query will be : index=botsv1 sourcetype=”stream:http” http_method=”POST” form_data=*username*passwd* dest_ip=”192.168.250.70″ | rex field=form_data “passwd=(?<userpassword>\w+)” | stats count values(src) by userpassword | sort – count

And there we are, “batman” is the password for the CMS used on the Wayne Enterprise’s web application.
Next step is to determine the targeted uri, timing of the attack and the password.
For that we need to do below modifications in our search query : index=botsv1 sourcetype=”stream:http” http_method=”POST” form_data=*username*passwd* dest_ip=”192.168.250.70″ src=”40.80.148.42″ | rex field=form_data “passwd=(?<userpassword>\w+)” | search userpassword=* | table _time uri userpassword

Lockheed Martin Kill Chain –
Threat Picture –

That concludes the first part of our APT investigation journey using Splunk. In the next installment of this series, we’ll dive deeper into the specifics of using Splunk for threat hunting, analyzing the data we’ve collected, and taking steps to enhance our security posture. Stay tuned for more insights on how we can protect our digital world from these persistent threats. Thanks for reading, and see you in the next post as we continue our journey into the world of APT investigations with Splunk.
If you’re as passionate about Cyber-Security as I am, feel free to follow me on Twitter – @ANShrivastava03 for the latest updates and connect with me on LinkedIn – Aditya Narayan to stay in the loop with my posts and insights in the world of digital forensics. Let’s continue this fascinating journey together!