In this blog post, I will take you on a journey to create a fun and interactive web application that allows users to change the background color of a webpage with just a click. We’ll be using a modern tech stack that includes Vite as the build tool, React for the user interface, and Tailwind CSS for styling.
By the end of this tutorial, you will have a fully functional background changer web app that you can further customize and expand upon.
Project Setup
Before we dive into the code, let’s get familiar with the project structure:
README.mdindex.htmlnode_modulespackage-lock.jsonpackage.jsonpostcss.config.jspublicsrctailwind.config.jsvite.config.js
The heart of our project lies in the src directory, where you’ll find the App.jsx file, containing the React component that manages the background color change.
App.jsx: Managing Background Colors
Our App.jsx file is where the magic happens. This file defines a React component, App, which is responsible for managing the background color and rendering the color-changing buttons.
import { useState } from "react"
function App() {
const [color, setColor] = useState("grey")
return (
<div className="w-full h-screen duration-200" style={{background : color}}>
<div className="fixed flex flex-wrap justify-center bottom-12 inset-x-0 px-2">
<div className="flex flex-wrap justify-center gap-3 shadow-lg bg-white px-3 py-2 rounded-xl">
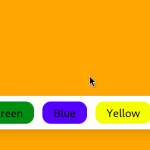
<button className="outline-none px-4 py-1 rounded-xl " style={{background : "red"}} onClick={() => setColor("red")}>
Red
</button>
<button className="outline-none px-4 py-1 rounded-xl " style={{background : "green"}} onClick={() => setColor("green")}>
Green
</button>
<button className="outline-none px-4 py-1 rounded-xl " style={{background : "blue"}} onClick={() => setColor("blue")}>
Blue
</button>
<button className="outline-none px-4 py-1 rounded-xl " style={{background : "yellow"}} onClick={() => setColor("yellow")}>
Yellow
</button>
<button className="outline-none px-4 py-1 rounded-xl " style={{background : "orange"}} onClick={() => setColor("orange")}>
Orange
</button>
</div>
</div>
</div>
)
}
export default AppCode Explanation
- We begin by importing the
useStatehook from React, which allows us to manage state within our component.
- Inside the
Appcomponent, we initialize thecolorstate variable with “grey,” which serves as the default background color.
- The JSX code structures our web app. The entire page’s background color is determined by the
colorstate variable.
- Below the main content, we create color-changing buttons. Each button is styled with a specific background color, and it has an
onClickhandler to change the background color when clicked. For example, clicking the “Red” button sets the background color to “red.”
main.jsx: Entry Point
Now, let’s take a look at the main.jsx file, which serves as the entry point for our application.
import React from 'react'
import ReactDOM from 'react-dom/client'
import App from './App.jsx'
import './index.css'

ReactDOM.createRoot(document.getElementById('root')).render(
  <React.StrictMode>
    <App />
  </React.StrictMode>,
)
Code Explanation
- We import React and ReactDOM to render our
Appcomponent into the HTML document.
- The
Appcomponent is imported from theApp.jsxfile.
- We create a React root using
ReactDOM.createRootand attach it to therootelement in our HTML file. This is where our React app will be rendered.
- We wrap the
Appcomponent in a<React.StrictMode>component. This enables various development features and checks in React to help catch potential issues early.
Conclusion
With this setup, you’ve created a simple yet engaging web application that allows users to change the background color with a single click. It’s a great starting point for exploring web development and learning how to integrate various technologies effectively.
You can extend this project in many ways. For example, you could add more color options, introduce animations, or save the user’s preference in local storage for a consistent experience across sessions. The possibilities are endless, and web development is a creative and rewarding journey.
Enjoy coding and have fun with your background changer web app!
Thanks for reading, and see you in the next post with more projects revolving around web development.
If you’re as passionate about Cyber-Security as I am, feel free to follow me on Twitter – @ANShrivastava03 for the latest updates and connect with me on LinkedIn – Aditya Narayan to stay in the loop with my posts and insights in the world of digital forensics. Let’s continue this fascinating journey together!